Environments & Layers
A layer is a named, reusable folder of data that lives on a compute node and is shared across workflow runs. Fill it once with something you'll need over and over, and from then on every run on that compute node can read it directly — no re-downloading, no re-installing.
There are two common kinds of layer:
- Environment — a Python (or R) package stack you can
importwithout installing anything (for example, an environment carrying pandas, scipy, scikit-learn). - Reference data — large shared files that many analyses read but that aren't your results: a reference genome, a trained model, a lookup table, an ontology.
Either way the idea is the same: prepare something once, reuse it across many runs.
Why layers exist
Without layers, every run starts from a clean slate — re-installing the same packages or re-downloading a 12 GB genome each time. Layers fix that:
- Speed. The data/packages are already on the node when the run starts.
- Cost. You pay to store it once, not once per run. Pennsieve also moves layers that haven't been used recently to a cheaper storage tier automatically.
- Consistency. Every run uses the exact same copy — no version drifting between runs.
How it works
   layer "scientific-stack"  /  "hg38-reference"
   (prepared once, lives on the compute node)
                 │
                 │  attached to your notebook / run  (read-only)
                 ▼
   notebook or workflow step  ──▶  import pandas  /  read /mnt/layers/hg38-reference/
When a notebook or workflow step is set to use a layer, Pennsieve mounts it read-only for that run at /mnt/layers/<layerName>/. A run only sees the layers it explicitly requests, so it's safe to keep many layers on a node and mount just the ones you need.
Using a layer
In a notebook: the launcher has an Environment step — pick the environment you want and it's mounted into the session. Open the notebook, import what you need, and go. Only environments built for that notebook's language and compute node are offered.
In a workflow run: when you configure the run, request the layer(s) the step needs. Your processor reads them at /mnt/layers/<layerName>/ — no download, no setup.
Rerunning keeps the environment. "Rerun with configuration" carries the layers from the original run, so a reproduced run uses the same packages/data.
Where to find layers
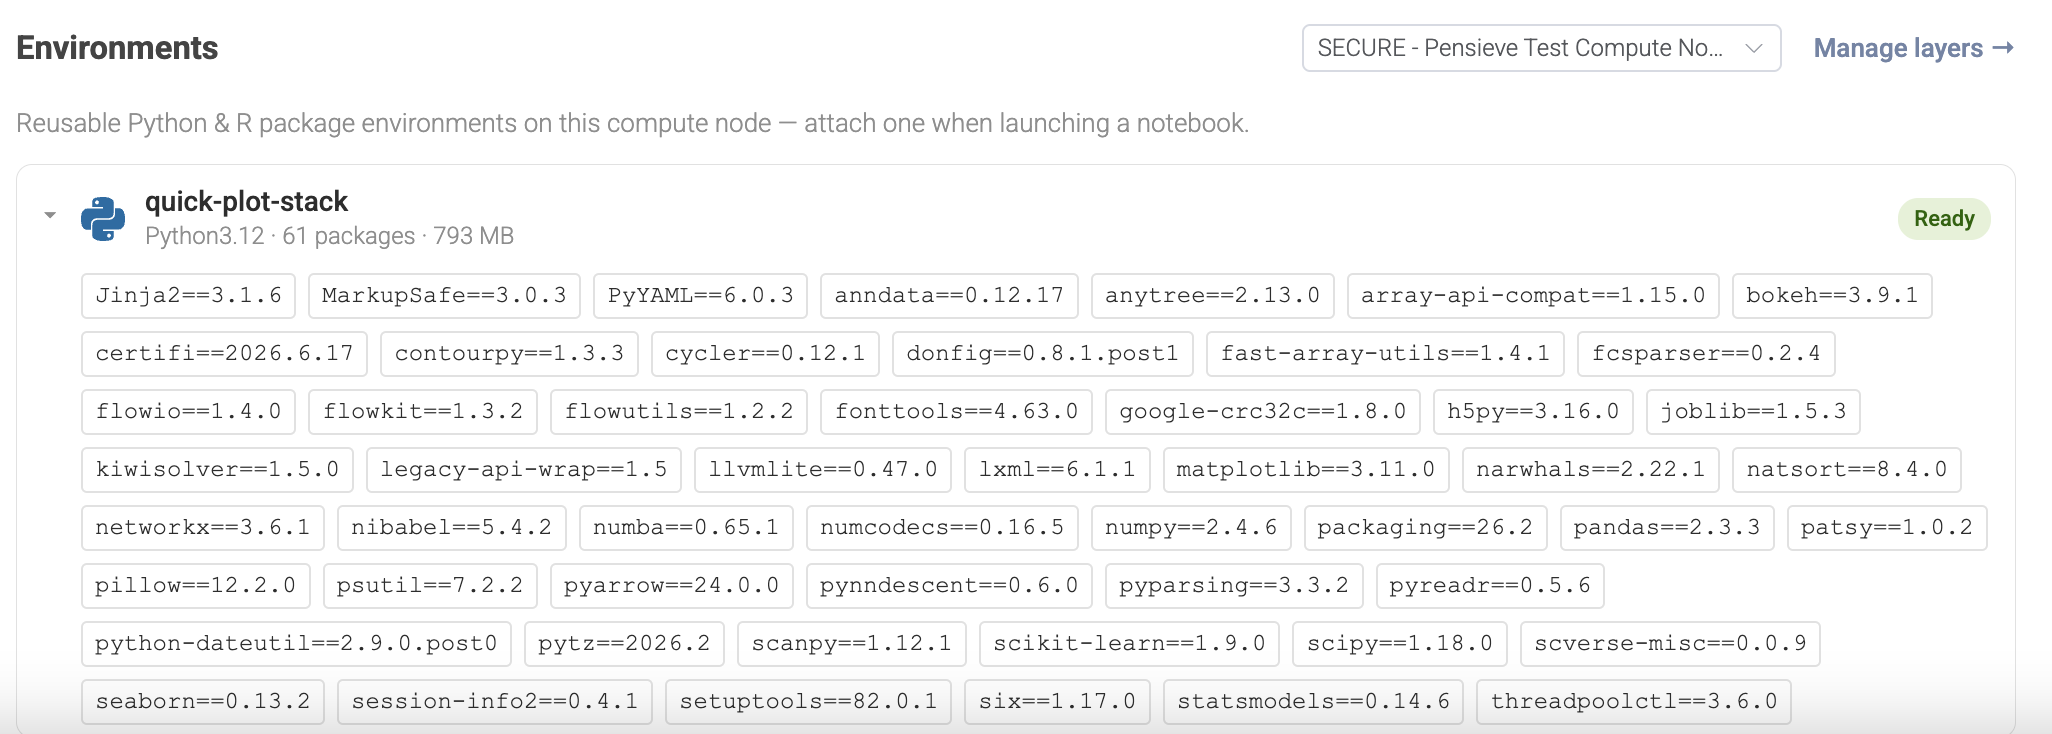
- Notebooks page → Environments section lists the Python and R environments on each of your compute nodes. Expand one to see its exact packages. The Manage layers link opens the compute node's settings.
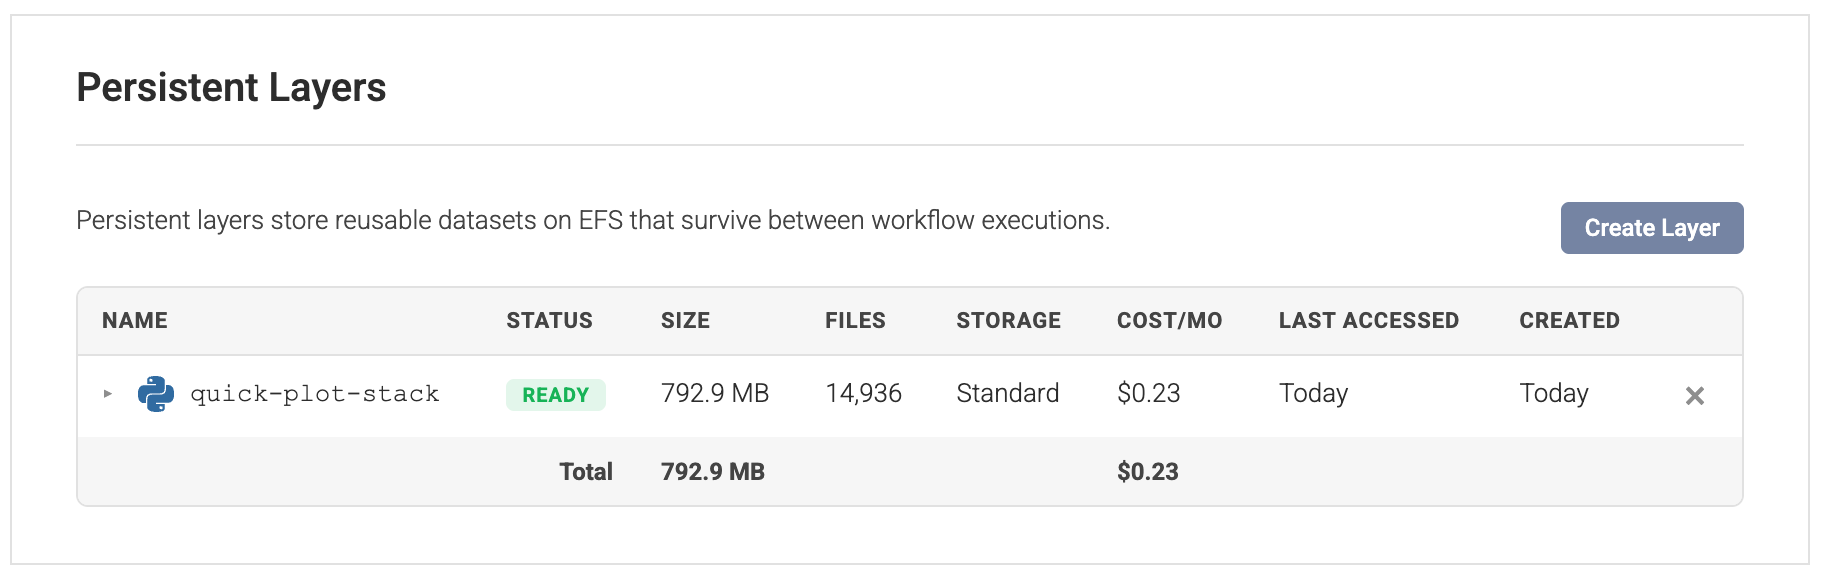
- Analysis → Compute Nodes → (your node) → Layers tab shows every layer on the node with its name, status, size, file count, storage class, estimated monthly cost, last access time, and creation date.
Environments and notebooks are scoped to compute nodes with notebook (interactive) support — those are the nodes shown in the pickers.
Creating an environment (Python / R package stack)
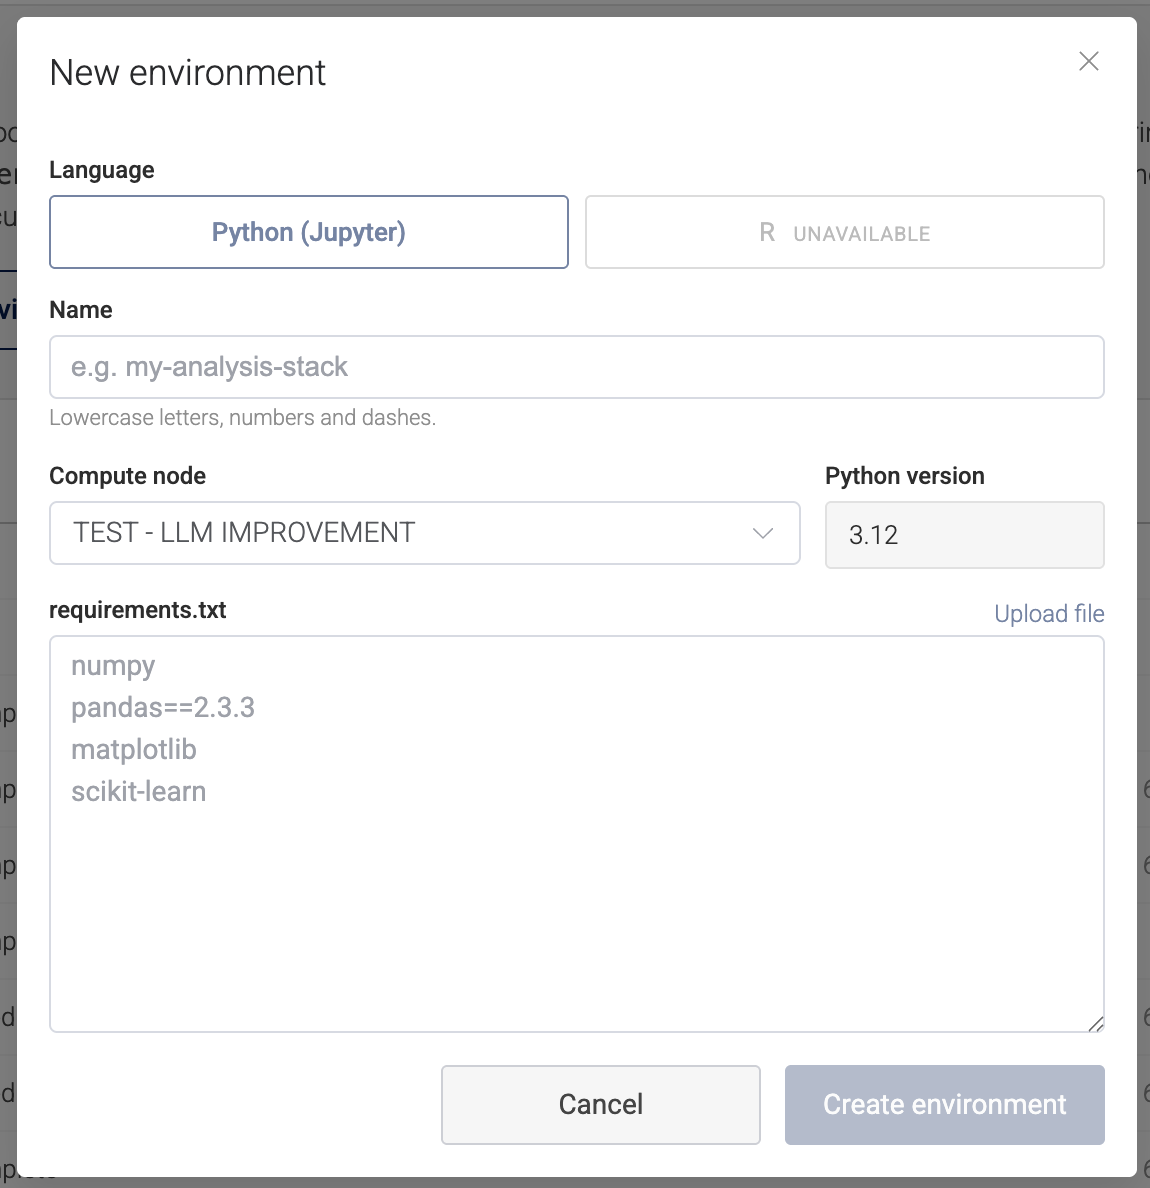
This is the easy, self-serve path. On the Notebooks page, click New Environment:
- Pick the language — Python (and R, where your workspace provides an R builder).
- Pick the compute node — the environment is built on and belongs to that node.
- Name it — lowercase letters, numbers, and dashes (e.g.
scientific-stack). - Provide your packages — paste or upload a
requirements.txt(the same format you'd use withpip install -r).
Pennsieve builds it in the background. When it's READY it appears in the Environments section and the notebook launcher, ready to mount into any notebook or run on that node.
Environments are built for the workspace's supported Python version (currently 3.12). Use them with notebooks/steps running that same version.
Creating a reference-data layer
For shared files (not a package stack), you create an empty layer and fill it with a one-time loader workflow.
- Create the layer. On the compute node's Layers tab, click Create Layer. Give it a lowercase-with-dashes name (e.g.
hg38-reference) and a short description (e.g. "Human reference genome GRCh38, Ensembl release 110"). It starts out EMPTY — the record exists but has no data yet. - Populate it. Run a workflow whose data target type is persistent-layer:
- Data source — where the source data lives (a dataset, an external URL, …).
- Processor — fetches / unpacks / transforms it.
- Data target — set type to persistent-layer and set its
layerNameto the layer you created (you can also create the layer inline from that dropdown).
- Run it once. When it finishes, the layer flips from EMPTY to READY and its size and file count fill in. From then on any run can mount it.
You usually populate a reference layer only once. Re-running the loader overwrites/adds to it, so only do that when the source data changes.
Adding a package live in a notebook
Need something just for the moment? pip install it right in a running notebook — it's available immediately for that session. But it doesn't stick around: anything you install live goes away when the session ends, just like restarting Python on your laptop. If you need it every time, put it in an environment instead.
Layer statuses
| Status | Meaning |
|---|---|
| EMPTY | The layer exists but has no data yet. Build it (environment) or run a loader workflow (reference data). |
| READY | The layer is populated and can be mounted into notebooks and runs. |
Storage tiers and cost
Pennsieve tracks when each layer was last accessed and automatically moves unused layers to a cheaper Infrequent Access (IA) tier. The Layers table shows the current tier (Standard or IA) and the estimated monthly cost per layer, plus a total. You pay only for storage — there's no per-run charge for mounting a layer.
Deleting a layer
Compute node owners can delete a layer from the Layers tab. Pennsieve refuses to delete a layer that's in use by an active run — wait for those to finish. Deletion removes both the data and the metadata record and cannot be undone; workflows that depend on the layer will fail until it's recreated and re-populated.
Good to know
- Shared and reused. A layer belongs to the compute node, not a single run — once set up, every run on that node can use it.
- Read-only to a run, enforced. A run can read the layers it mounts but cannot modify them; one run can't change a layer out from under another.
- Any run on the node can read a layer. A run uses only the layers it selects, but every layer on the node is readable by any run on it — so don't put secrets or private data into a layer.
- Runs are isolated from each other. A notebook/run can read and write only its own working area (plus the read-only layers it mounts) — never another run's data.
- Live installs are session-only. Great for exploring; for anything permanent, make an environment.
- Match the Python version. Environments are built for a specific Python version (currently 3.12); use them with notebooks/steps running that version.
- Recorded with the run. Pennsieve remembers which layers a run used, so you can tell exactly what produced a result.
FAQ
Environment vs. pip install in my notebook?
A live pip install lasts only for that session. An environment is built once and stays available to every notebook and run on the node.
How do I create an environment?
Notebooks page → New Environment → pick language + compute node, name it, paste/upload a requirements.txt. It builds in the background and then appears in the Environments list and the notebook launcher.
How do I create a reference-data layer?
Create an empty layer on the node's Layers tab, then run a workflow with a persistent-layer data target pointing at it.
Where do I see what's available?
The Environments section on the Notebooks page (for package stacks), or the node's Layers tab (for everything, with size/cost/status).
Can I use several layers at once?
Yes. Reference datasets don't conflict, and a run can mount as many layers as it needs.
My import / file isn't found.
Check that the layer is selected for the notebook/step, that it's on the same compute node, that its status is READY, and (for environments) that it matches your Python version.
Quick checklist — reference-data layer
- Open the compute node's Layers tab → Create Layer (lowercase-with-dashes name + description).
- Build or pick a workflow whose data target is persistent-layer, with its
layerNameset to your layer. - Run it once; wait for the status to become READY.
- In future runs, request the layer — it's mounted read-only at
/mnt/layers/<layerName>/.