Publishing Apps to the Pennsieve App Store from GitHub
Connecting your GitHub account to Pennsieve and publishing an application to the Pennsieve App Store
This guide walks you through connecting your GitHub account to Pennsieve, publishing an application to the Pennsieve App Store every time you cut a new GitHub release, and running that application against a dataset.
It is split into five parts:
- Linking your GitHub account to Pennsieve
- Choosing which repositories Pennsieve tracks
- Publishing a repository to the App Store on each GitHub release
- How application permissions work
- Running an application in a workflow
1. Linking your GitHub account to Pennsieve
Before Pennsieve can read your repositories or react to your releases, you need to tell GitHub that Pennsieve is allowed to act on your behalf. We do this once, through the Pennsieve GitHub Application.
Where to find it in the app
-
Sign in to Pennsieve.
-
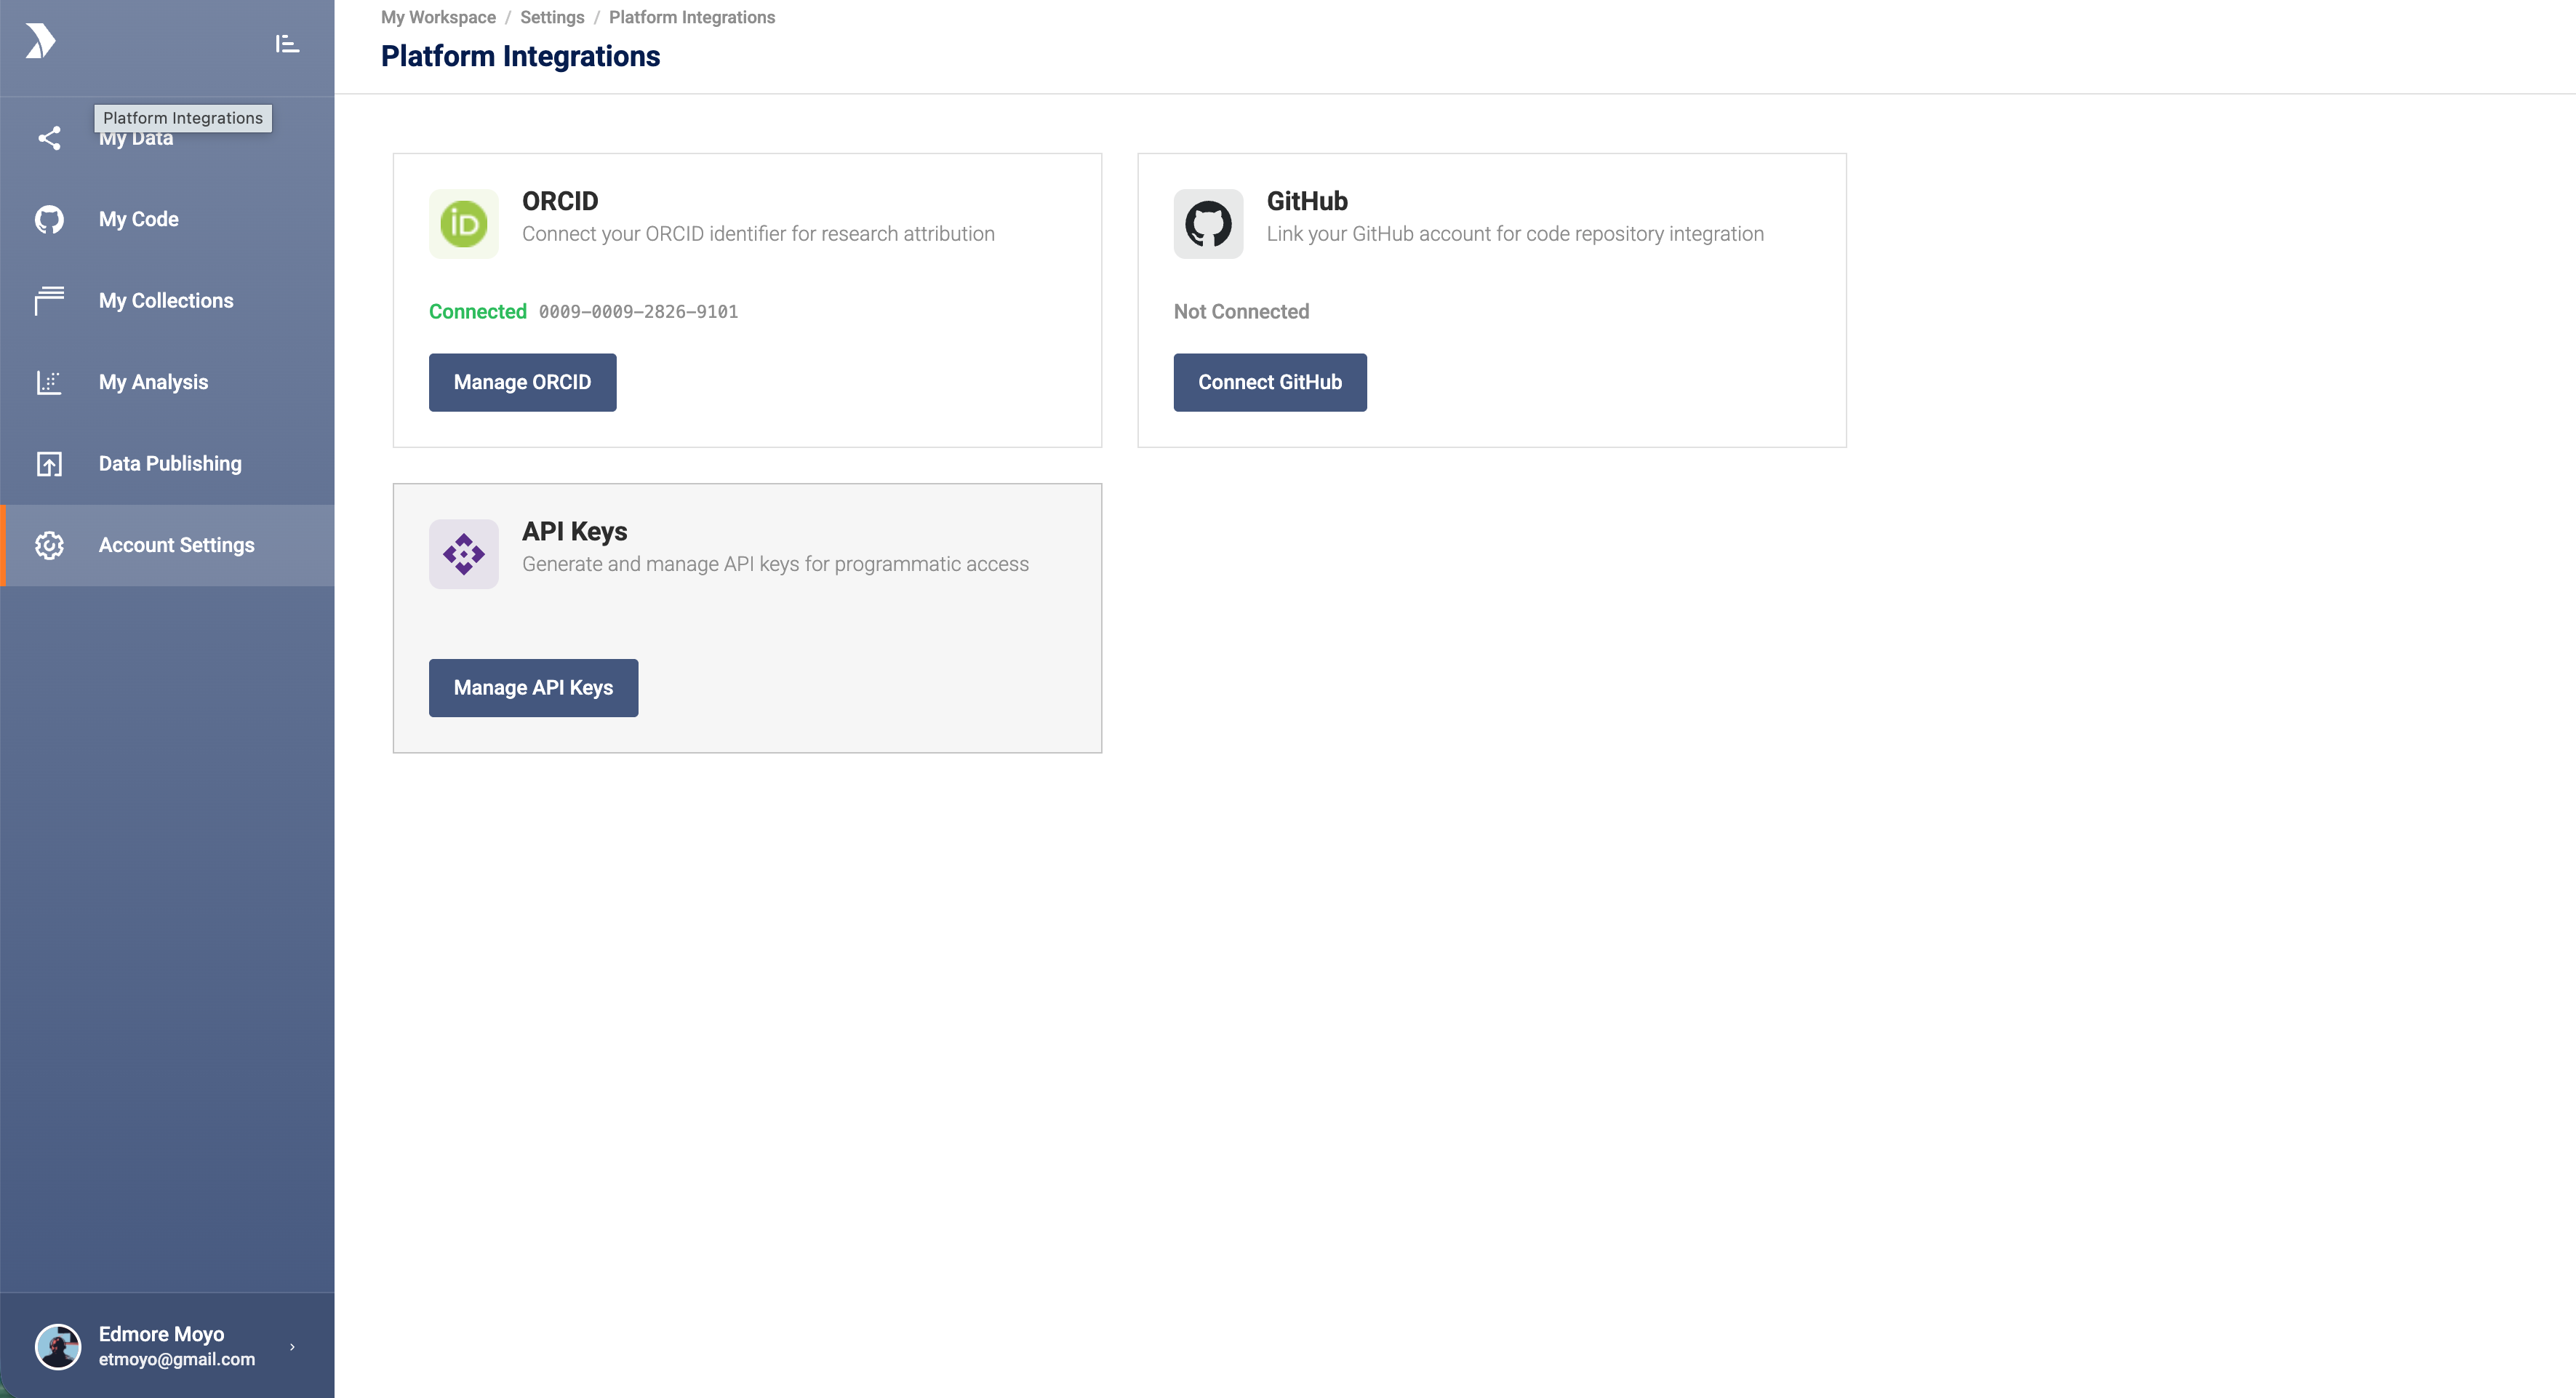
From the left navigation, open My Workspace → Settings.
-
Click Platform Integrations. You'll see a card for each available integration (ORCID, GitHub, API Keys).
-
On the GitHub card, click Connect GitHub.
(URL:
/my-workspace/settings/integrations/github)
What happens when you click Connect
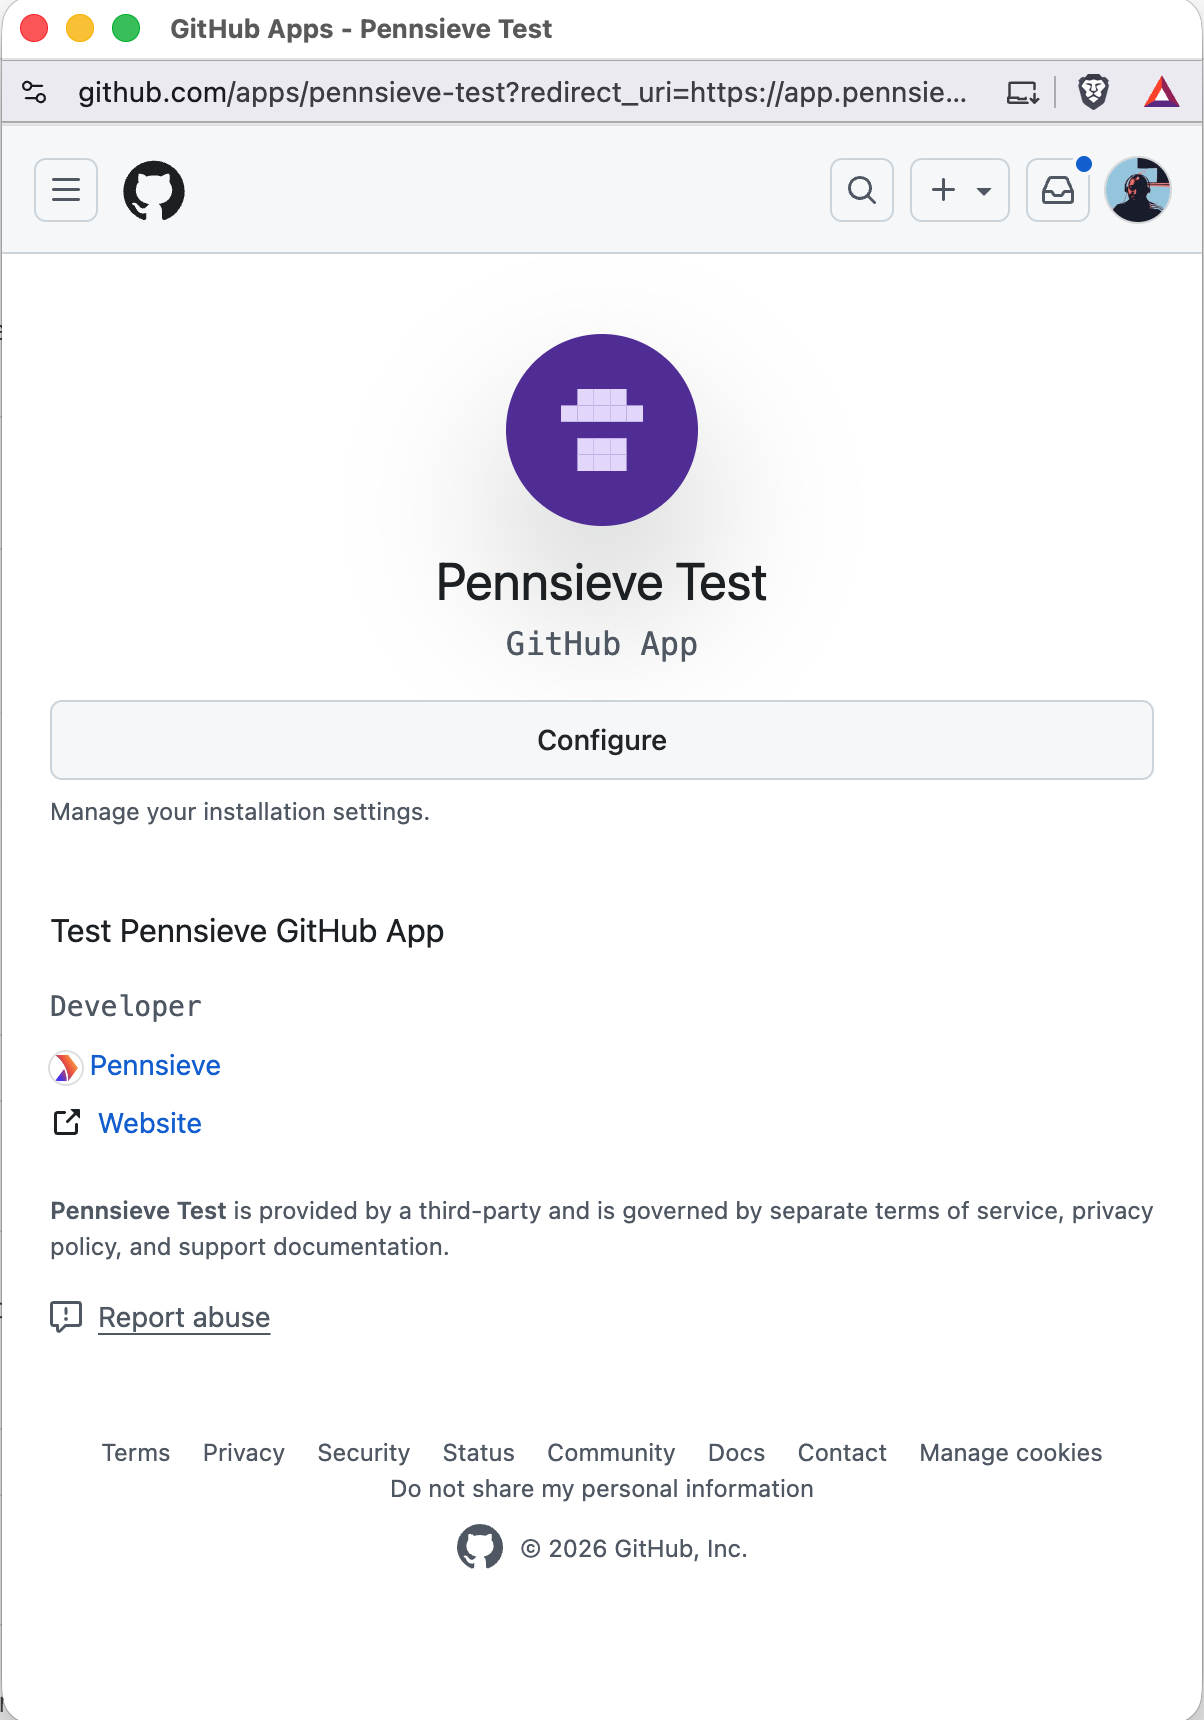
Pennsieve opens a popup window to GitHub. From there:
- GitHub asks you to sign in (if you aren't already).
- GitHub asks you to install and authorize the Pennsieve GitHub Application.
- GitHub asks you which repositories Pennsieve should be allowed to see:
- All repositories — Pennsieve can see every repo you own, now and in the future.
- Only select repositories — pick the specific repos you want to share with Pennsieve. This is the recommended option.
- Click Install & Authorize.
- The popup closes itself, and the GitHub card on the Integrations page now shows your GitHub username and a Connected badge.
Behind the scenes Pennsieve has:
- Exchanged the short-lived code GitHub returned for a long-lived access token.
- Looked up your GitHub profile (login, URL, avatar).
- Stored the access token and the GitHub installation ID against your Pennsieve user.
Updating which repos Pennsieve sees
After you've connected, the GitHub integration card shows two buttons:
- Manage GitHub — opens the GitHub integration detail page on Pennsieve.
- Update Integration — re-opens the GitHub App install screen so you can add or remove repositories that Pennsieve can access. Use this any time you create a new repo that you want Pennsieve to track.
Disconnecting
To remove the connection, open the GitHub detail page (Manage GitHub) and click the delete (trash) icon next to your GitHub username. A confirmation dialog explains what disconnecting does:
- Pennsieve will no longer track GitHub repositories in your account.
- GitHub releases will no longer result in Pennsieve GitHub publications.
- You can no longer create Applications and Workflows on Pennsieve.
You can re-link any time by repeating the connect flow.
2. Choosing which repositories Pennsieve tracks
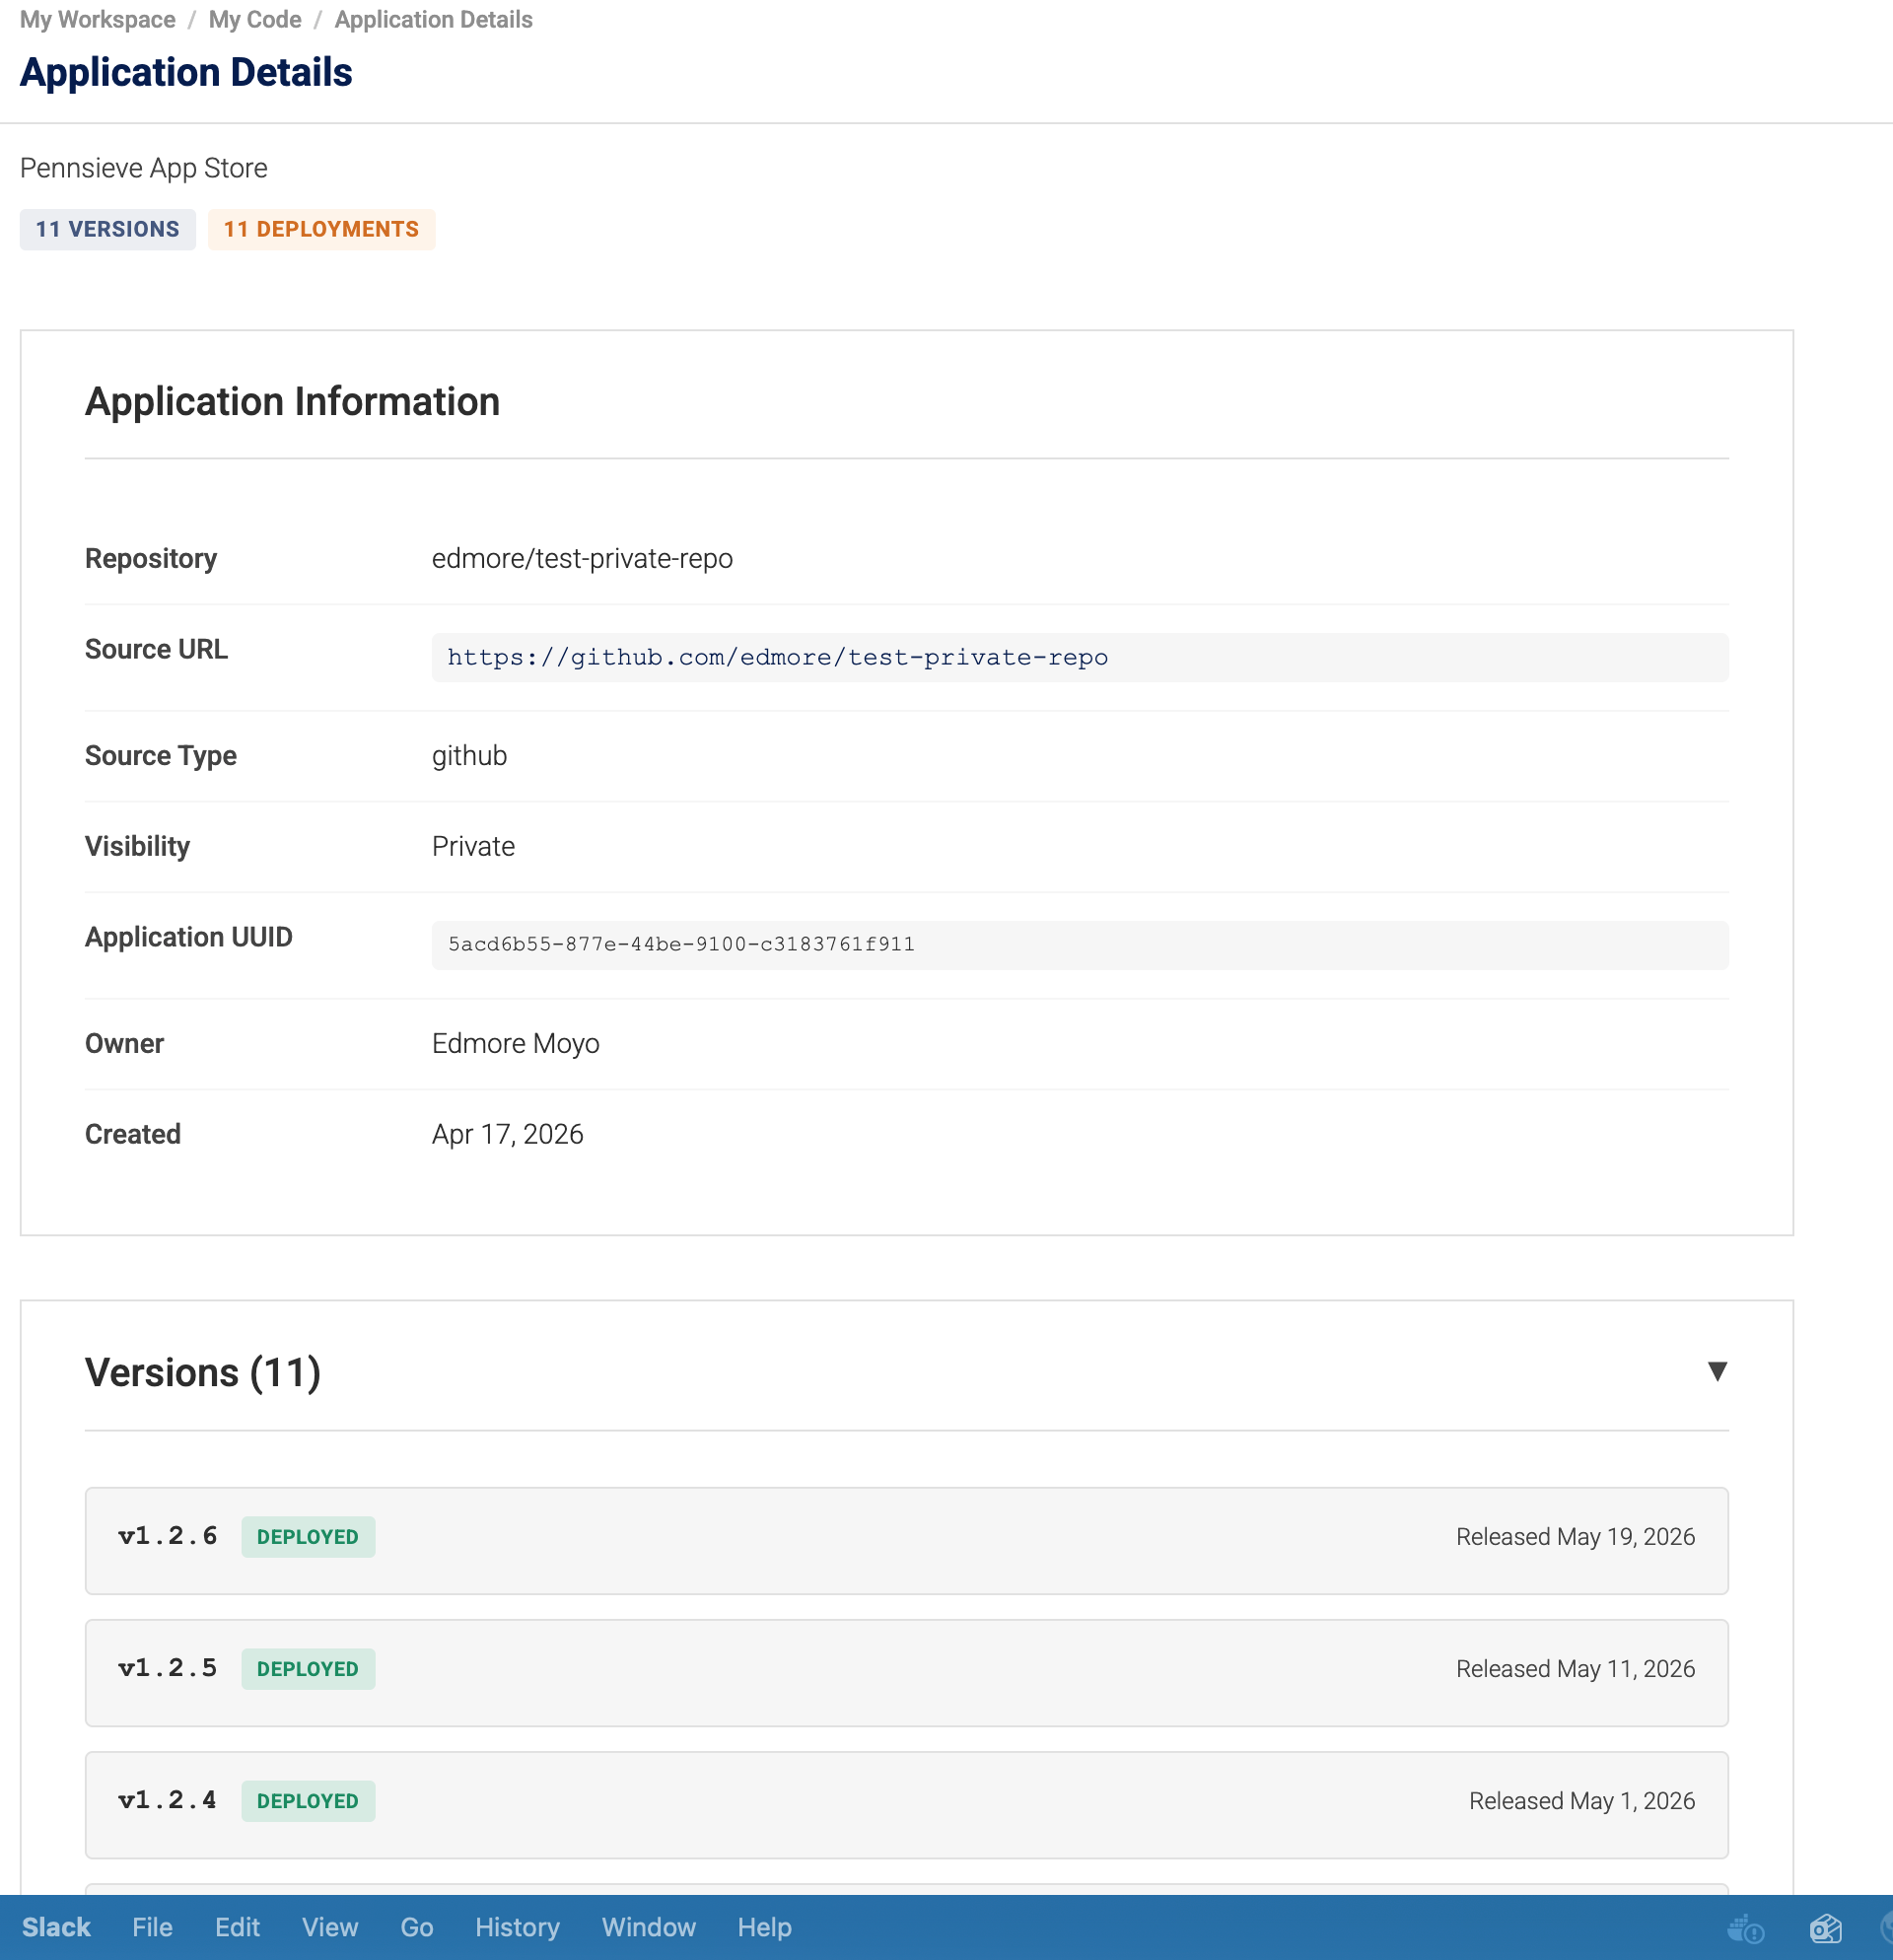
Once your GitHub account is linked, Pennsieve shows the repos the Pennsieve GitHub Application has access to under My Workspace → My Code (URL: /my-workspace/code).
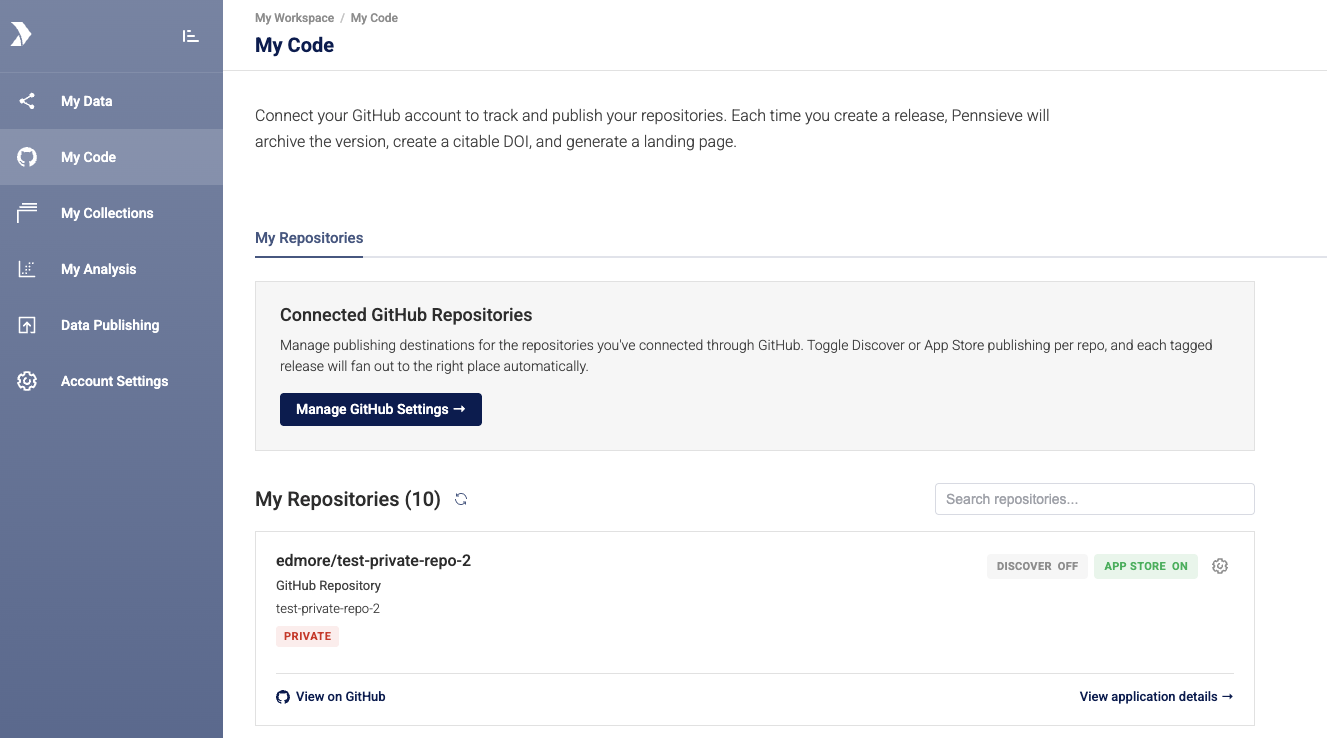
The My Code page lists each repository with:
- The repo name and a link out to GitHub.
- A Private badge if it's private on GitHub.
- The primary language of the repo (e.g.
Python,Go). - A Publishing Settings box showing whether each destination is On or Off for that repo:
- Discover — generate a citable DOI and a public landing page for each release.
- App Store — register each release as a new version of an application in the Pennsieve App Store.
Use the refresh icon at the top of the list to pull the latest set of repos from GitHub (e.g. after you've added a new repo to the GitHub App installation).
Turning on publishing for a repository
-
On the repo's row, click the settings (gear) icon inside the Publishing Settings box.
-
The Publishing Settings dialog opens.
-
Tick the destinations you want:
- Pennsieve Discover — publish each release as an archived, citable dataset with a DOI and landing page.
- App Store — publish each release as a new version of an app in the Pennsieve App Store.
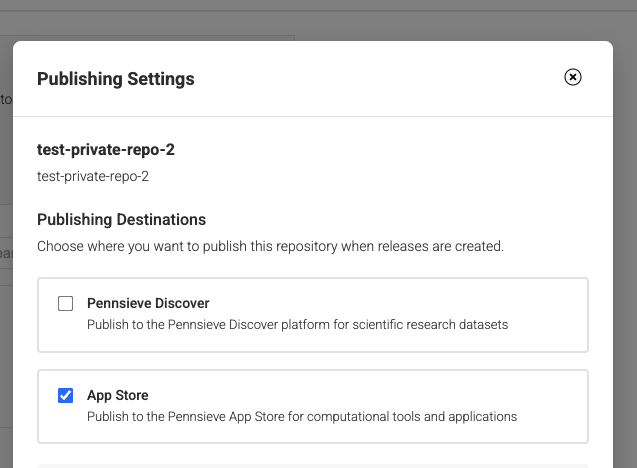
-
Click Save Settings.
From this point forward, every release you publish on GitHub for this repo will produce a Pennsieve publication in the destinations you ticked.
3. Publishing a repository to the App Store on each GitHub release
Once App Store is turned on for a repo, the developer workflow is just normal GitHub — there's nothing to push from inside Pennsieve.
How it works at a glance
You publish a GitHub release  ─►
GitHub notifies Pennsieve  ─►
Pennsieve builds the release as a new App Store version  ─►
Shows up in the catalog
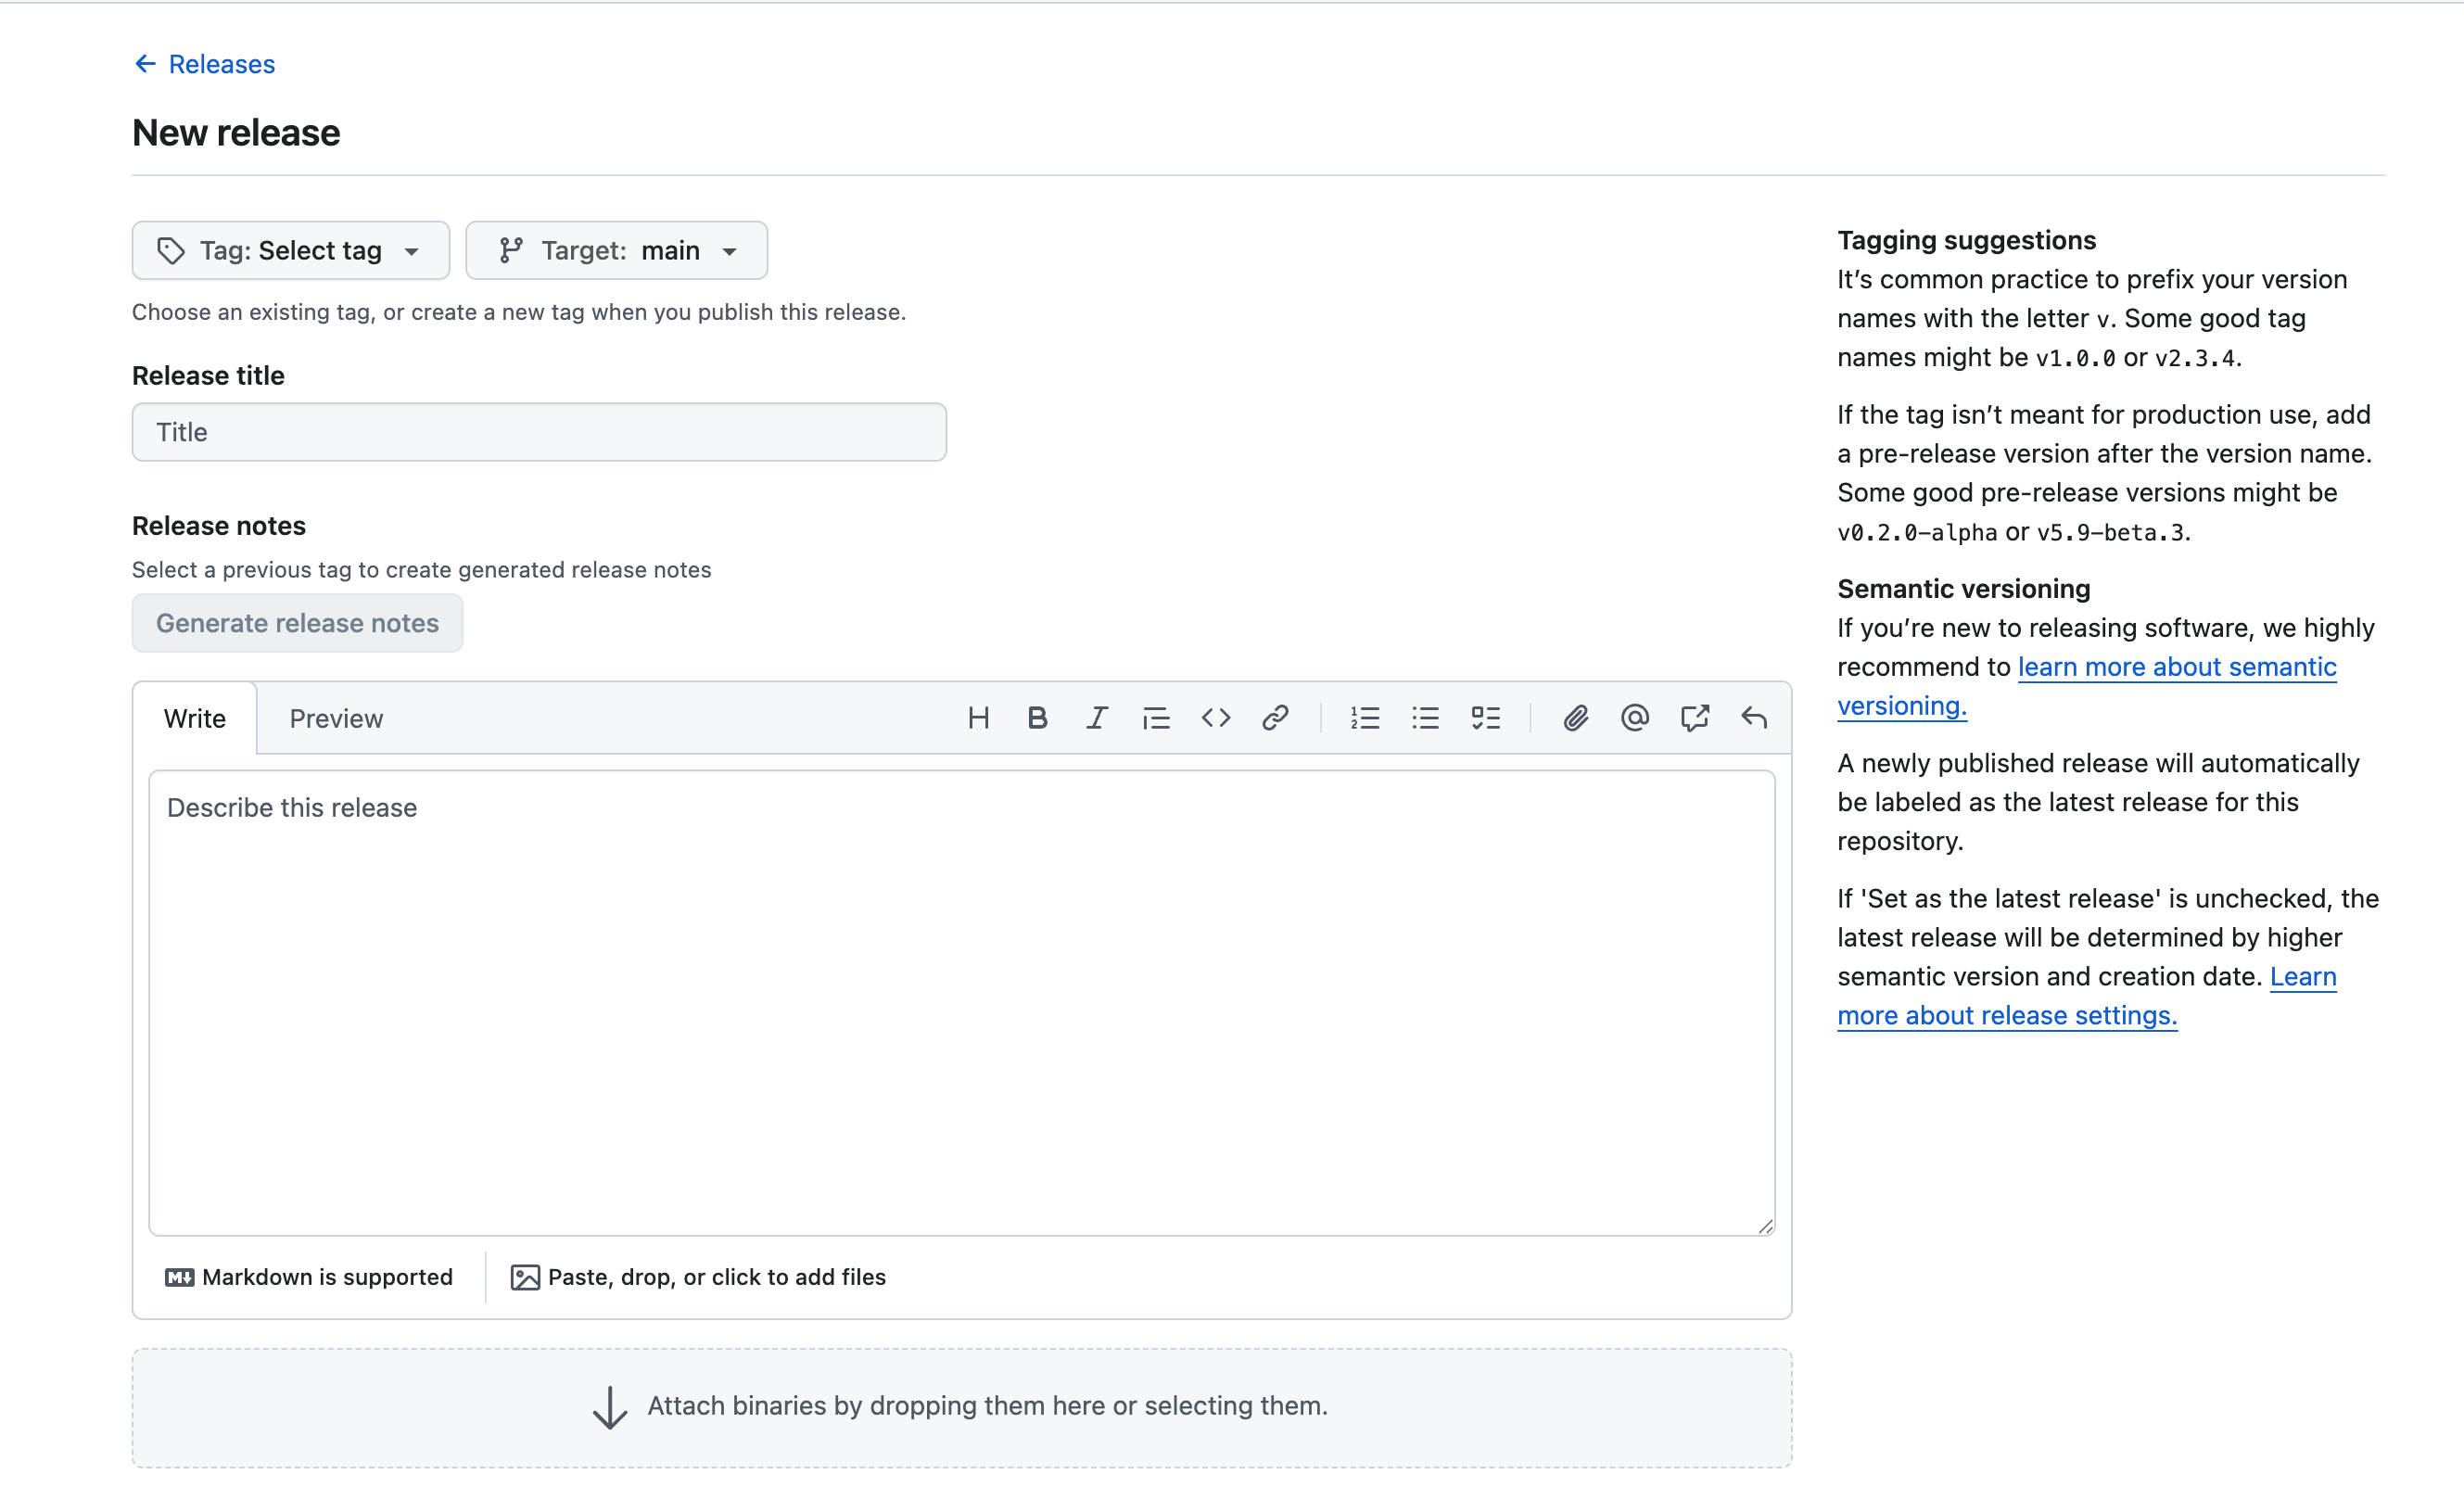
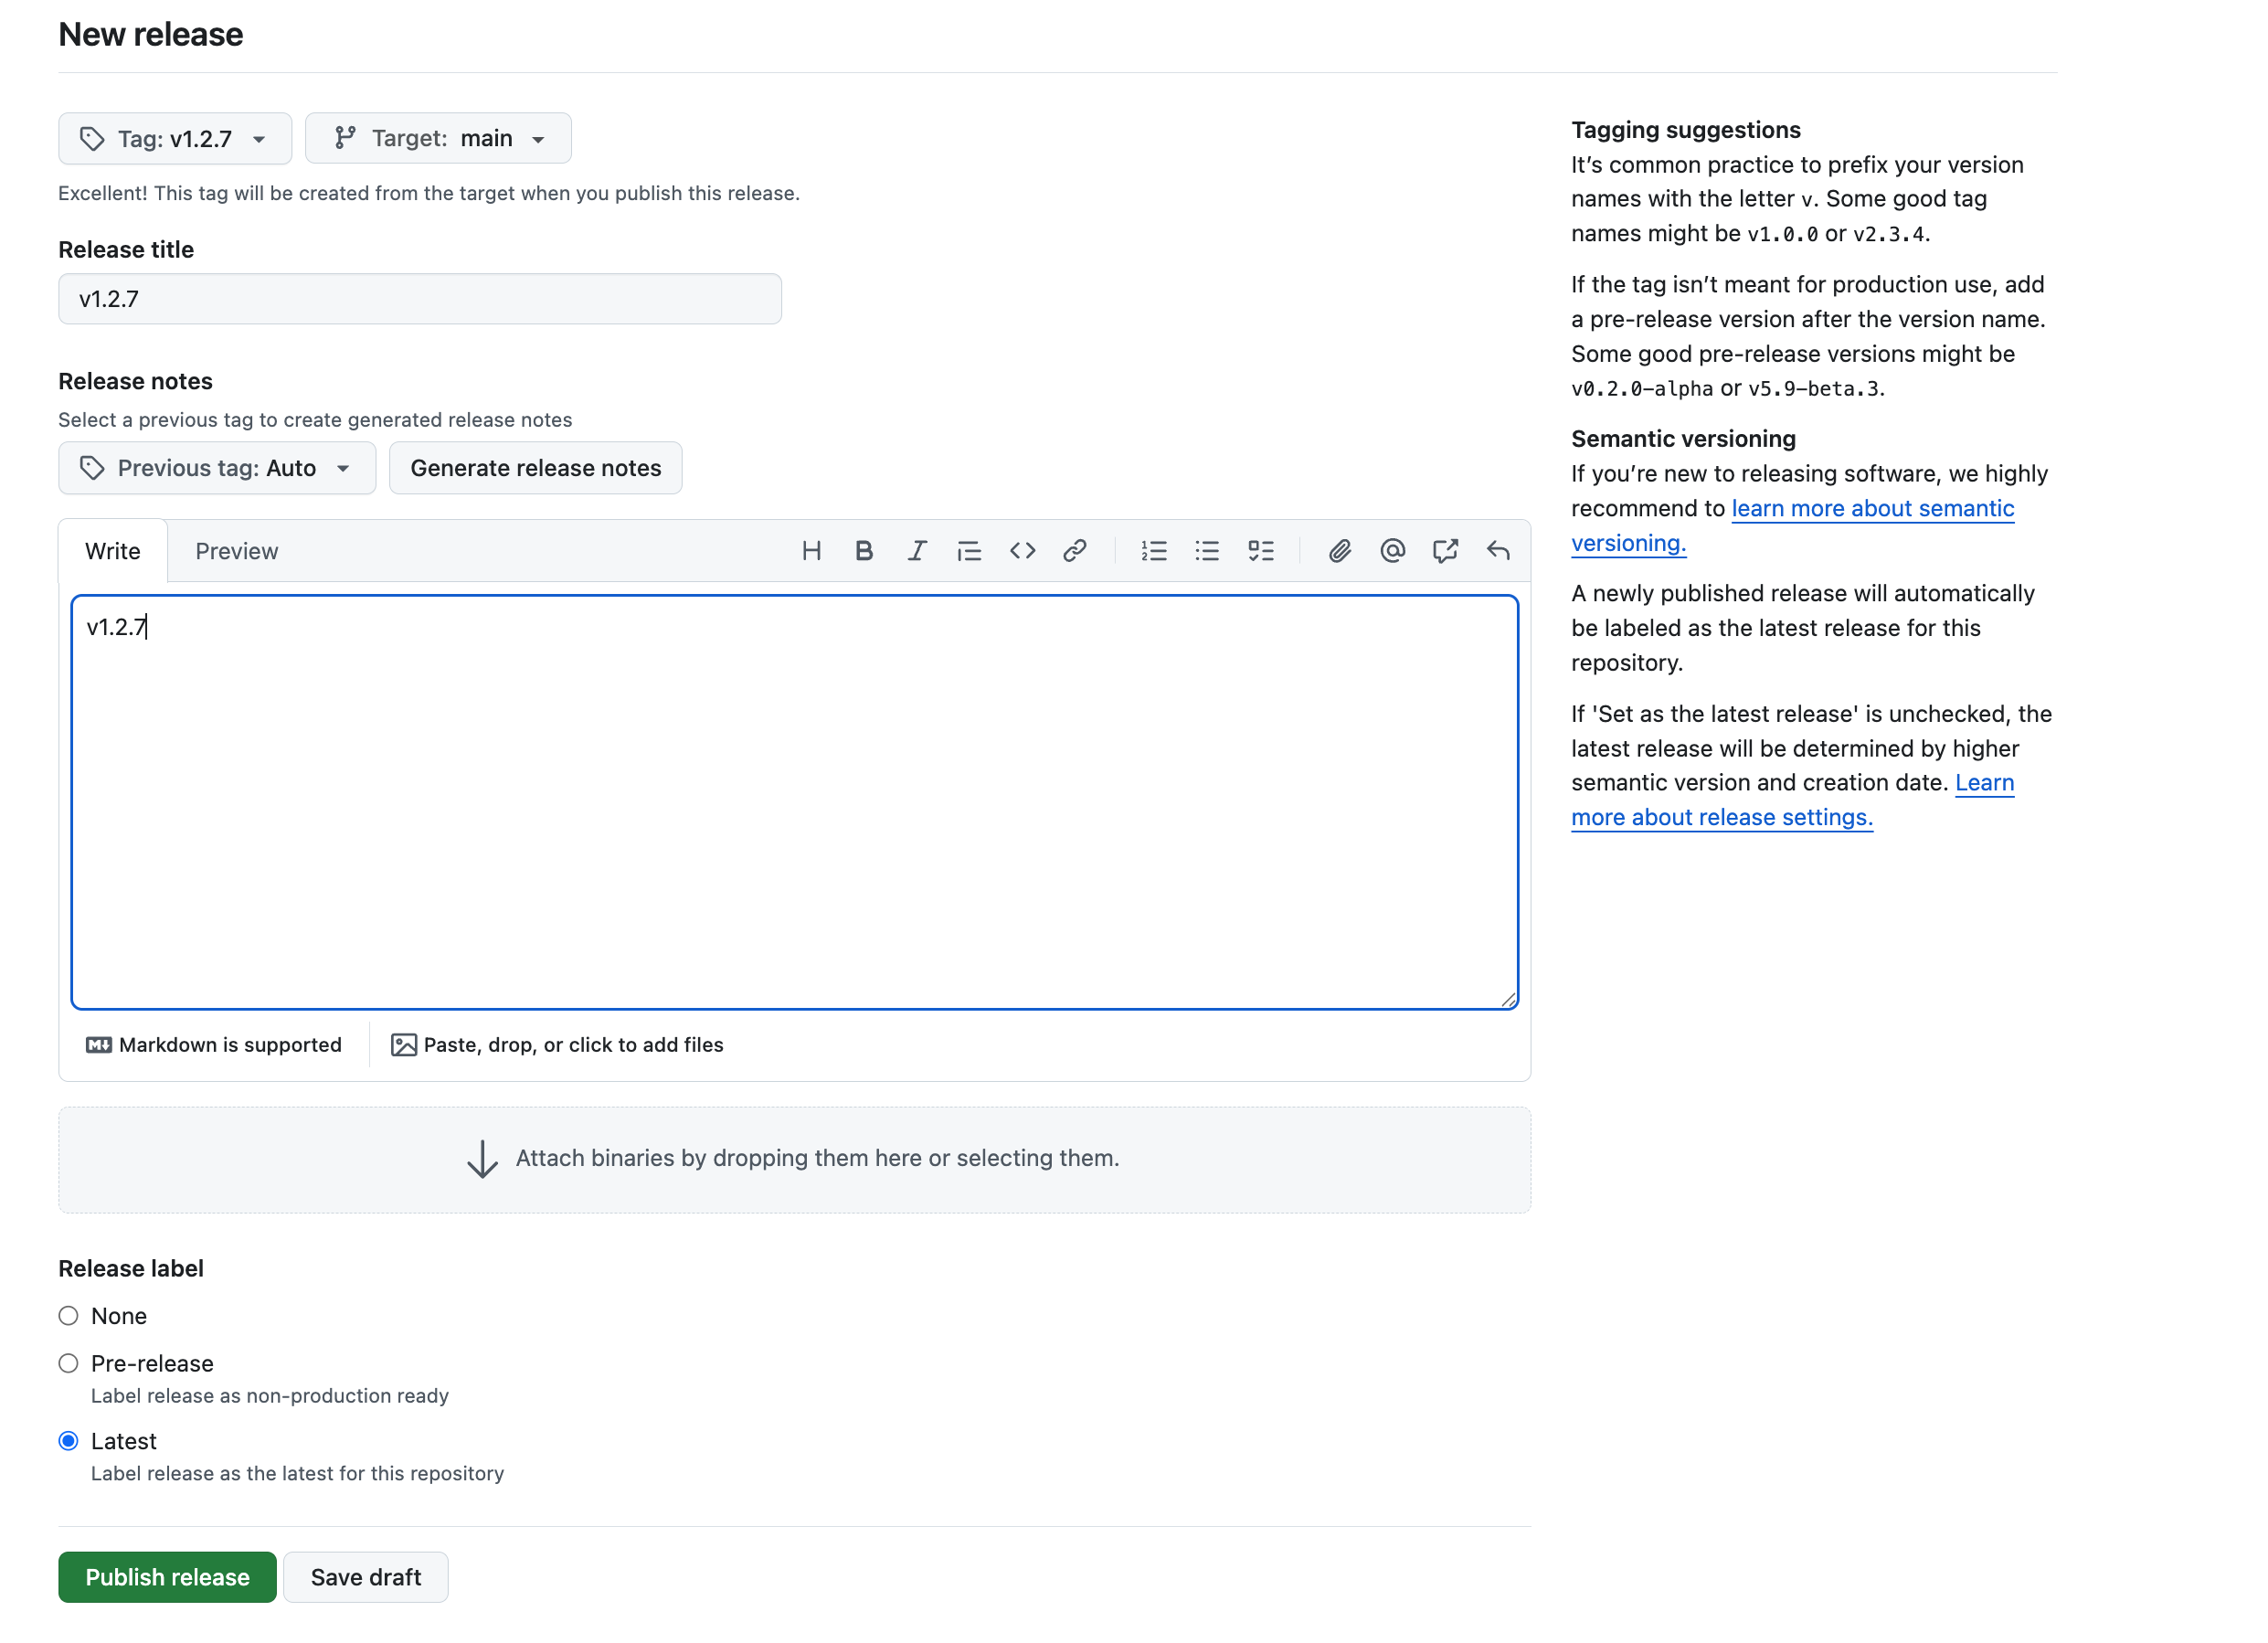
Cutting a new release
-
Tag your commit (e.g.
v1.0.7). -
On GitHub, click Releases → Draft a new release, select the tag, fill in release notes, and click Publish release.
-
Pennsieve picks up the release automatically:
- A new version entry is created for your app in the App Store, starting in
registeringstate. - A background job clones the release tag, builds it, and pushes it to Pennsieve's container registry.
- When the build succeeds, the version status flips to
deployedand is runnable from the App Store.
- A new version entry is created for your app in the App Store, starting in
-
You can watch progress under App Store → [your app] → Versions. Statuses move through:
registering→building→deployed(success), orfailed(with a reason — usually a missingapplication.jsonor a build error).
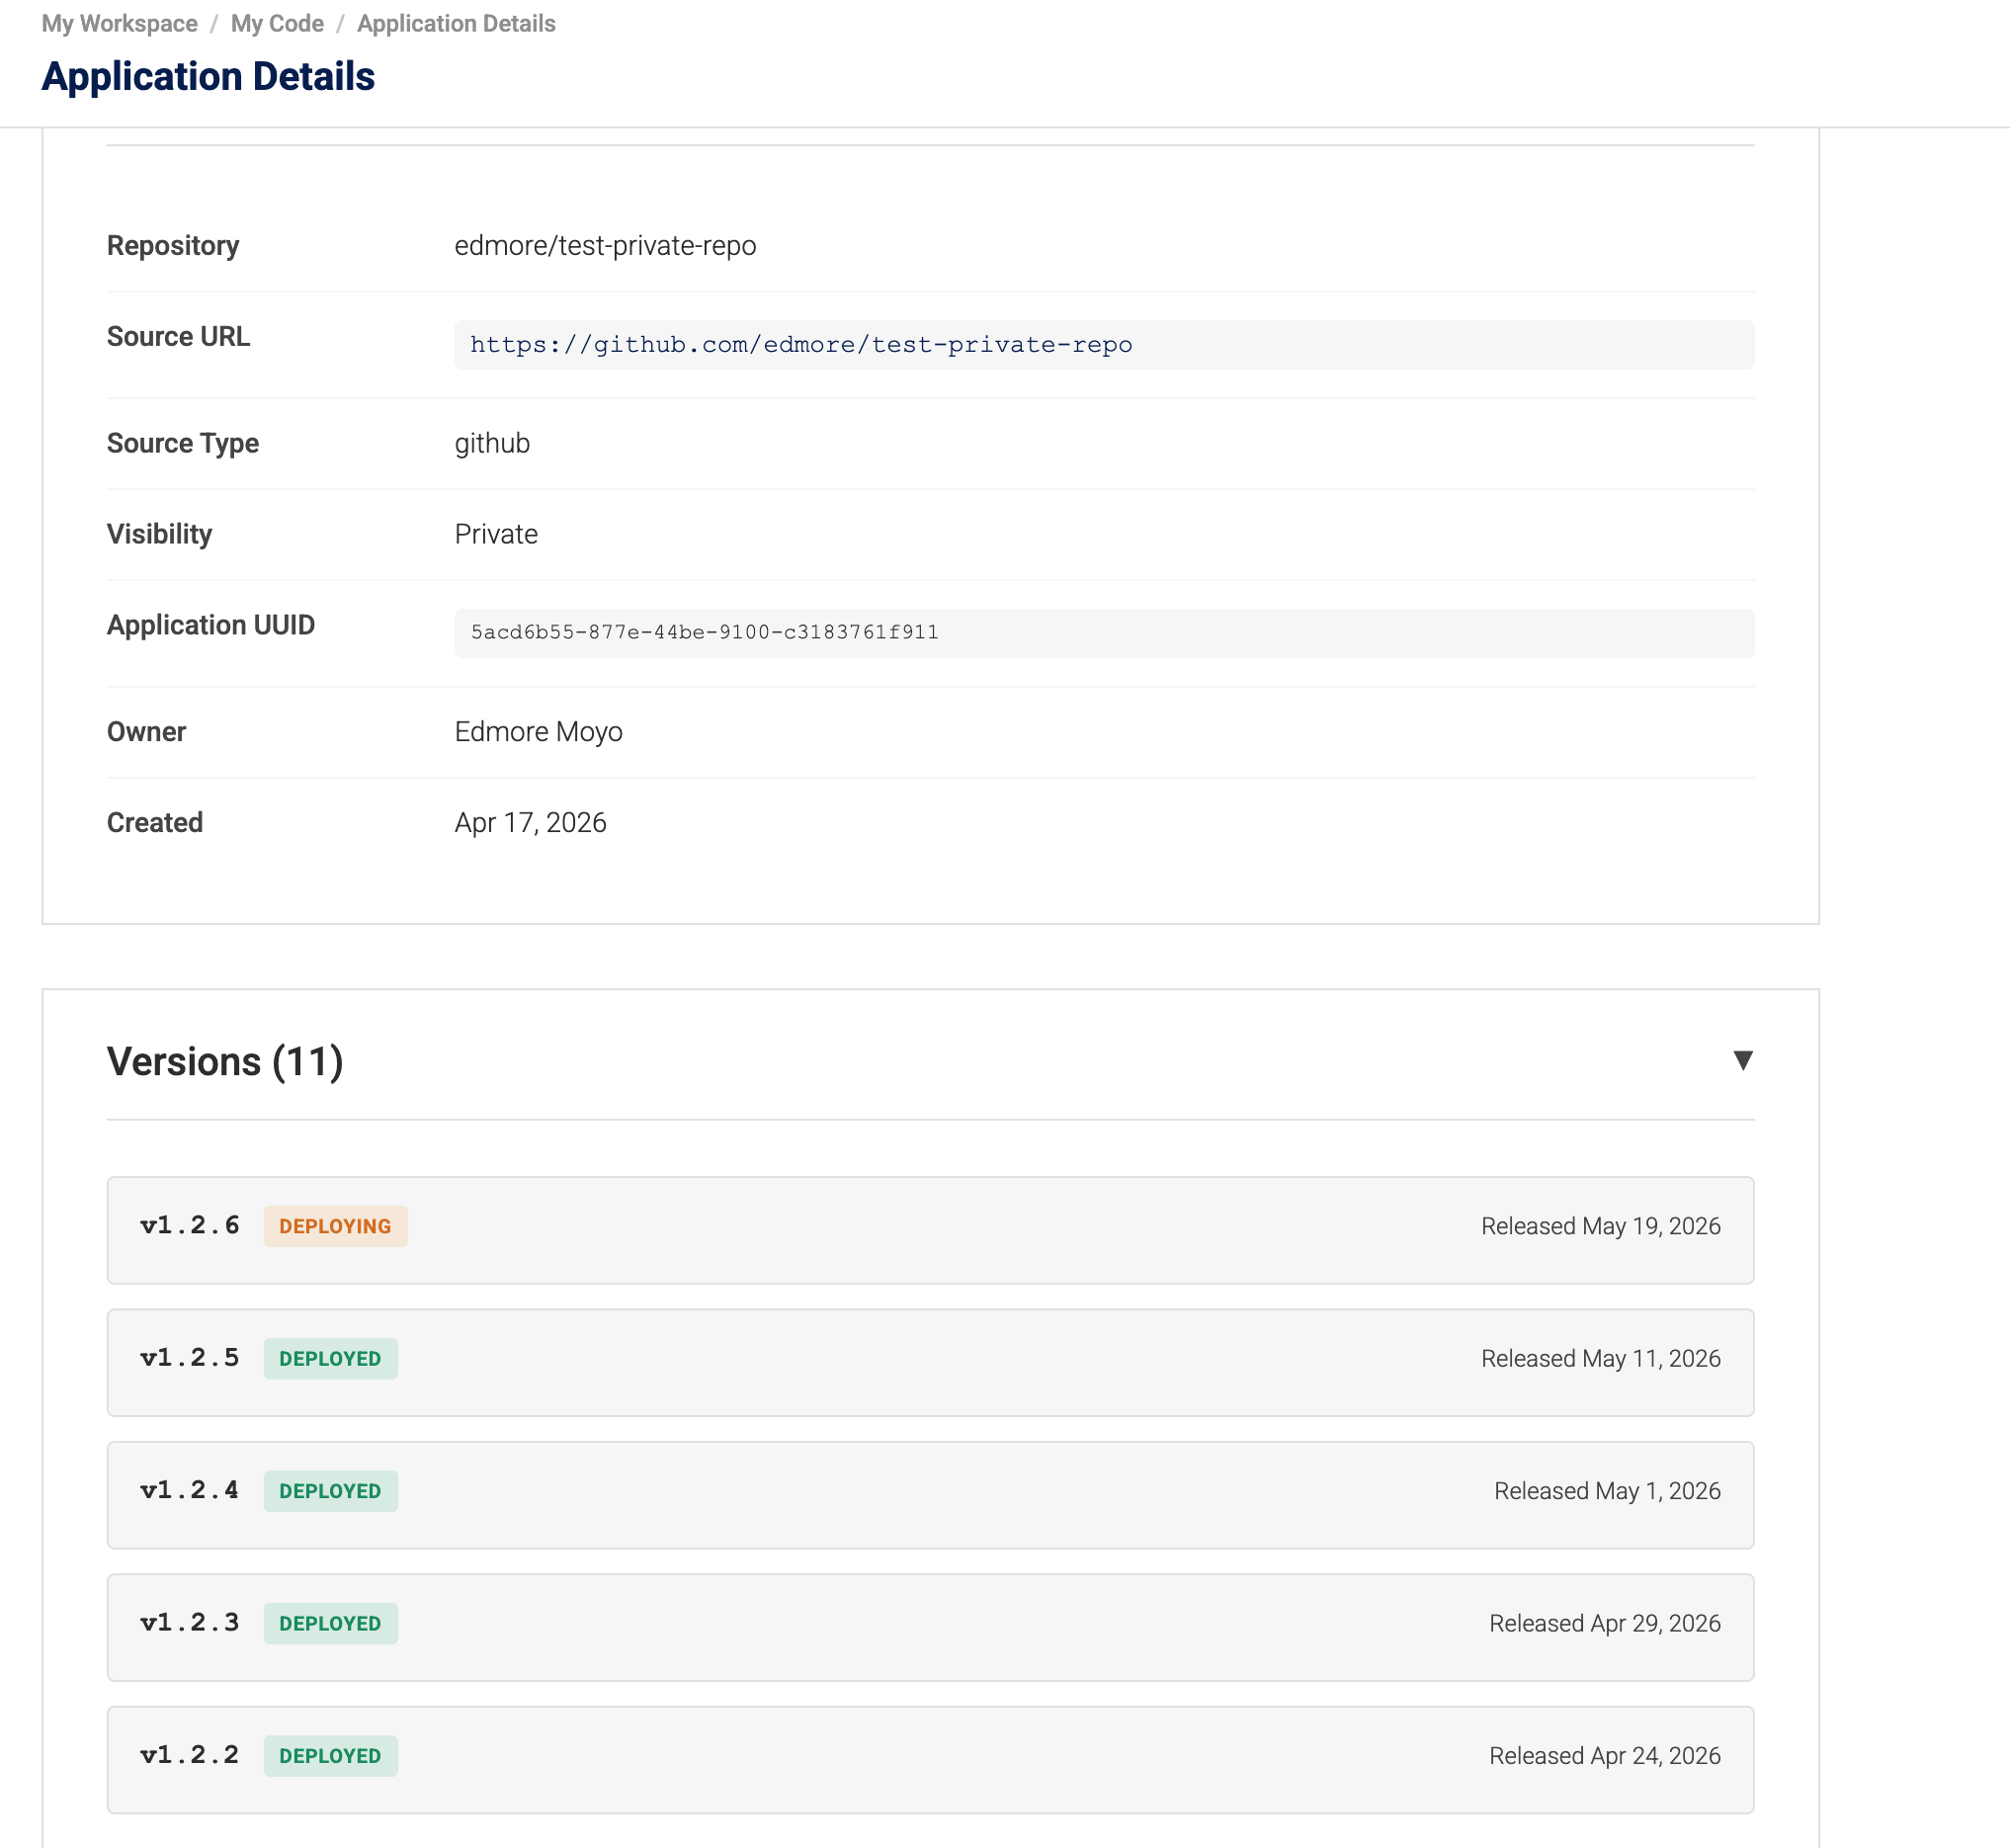
Once the build completes, the version's badge turns green and it becomes selectable in workflow configuration.
Tag naming guidance
The tag you pick becomes the version label everywhere in Pennsieve — App Store catalog, version history, workflow configuration. A few rules of thumb:
- Prefix with
v—v1.2.0,v2.3.4. Consistent prefixes make version lists easier to scan. - Follow semantic versioning — see semver.org. Bump major / minor / patch to communicate the scope of the change to anyone running the app.
- Pre-releases — use a suffix such as
v1.2.0-alphaorv0.9.0-beta.1for non-production cuts. - Don't reuse tags — see Updating a release below.
Private repositories
Private repos work exactly the same way. Pennsieve uses the access token stored when you linked your GitHub account, so the linked account must have access to the repo. If you lose access on GitHub (e.g. you leave the org that owns the repo), Pennsieve will no longer be able to build new releases.
Updating a release
Pennsieve treats each release tag as immutable. To ship a fix, cut a new release with a new tag (e.g. v1.0.8). Re-tagging the same name on GitHub is not a supported way to update an existing App Store version.
Turning off App Store publishing
Open the repo's Publishing Settings dialog from My Code, untick App Store, and save. New releases will no longer be ingested. Existing versions remain in the App Store for users who already have them.
4. How application permissions work
Permissions on an App Store application answer two questions:
- Who can see this app in the App Store?
- Who can change this app's settings, sharing, or remove it?
Pennsieve's model is intentionally simple. Here are the concepts.
Who's involved
- Owner — the Pennsieve user who originally published the app. There is always exactly one owner. Only the owner can change visibility or share the app with others.
- Workspace — a Pennsieve organization/team space. Each app belongs to the workspace it was published in.
- Shared users / teams / workspaces — people, teams, or whole workspaces the owner has explicitly given access to. They can see and use the app but not change its settings.
Visibility: public vs private
Every app is either public or private.
| Visibility | Who can see it in the App Store catalog? |
|---|---|
| Public | Everyone with a Pennsieve account. Think of this as listing your app in an open marketplace. |
| Private | Only the owner, plus the specific users, teams, and workspaces the owner has shared it with. |
You set this once when you publish the app and can change it any time from the app's permissions page.
A useful analogy
Think of a published app like a document in a shared drive:
- Public = "Anyone with the link can view" — anybody in Pennsieve can find it.
- Private = "Restricted" — only you, plus people you explicitly invite, can see it.
- Owner = the person who created the document. They're the only one who can change sharing settings.
- Shared with you = your name was added to the list. You can open and use the doc, but not re-share it or delete it.
What can each role do?
| Action | Owner | Shared user / team / workspace member | Anyone else |
|---|---|---|---|
| See the app in the App Store catalog | ✓ | ✓ | ✓ public only |
| Run / use the app | ✓ | ✓ | ✓ public only |
| Change the visibility (public ↔ private) | ✓ | ✗ | ✗ |
| Share with more users / teams | ✓ | ✗ | ✗ |
| Remove the app from the App Store | ✓ | ✗ | ✗ |
| Publish new versions (via GitHub releases) | ✓ (whoever owns the linked GitHub account) | ✗ | ✗ |
Sharing with users, teams, or whole workspaces
When an app is private, the owner can grant access at three levels:
- A user — one named Pennsieve user gets access.
- A team — every member of that team gets access. If the team grows, new members inherit it automatically.
- A workspace — everybody in that workspace gets access. Use this when you want all colleagues in a workspace to be able to run the app without naming each one.
A user is considered to have access if any one of these is true: they're the owner, they were shared individually, they belong to a team that was shared with, or they belong to a workspace that was shared with.
Practical examples
-
"I want this app available to anyone on Pennsieve."
Set visibility to Public. No sharing list needed. -
"I want only my lab to see this app."
Set visibility to Private and share it with your workspace. -
"I'm collaborating with two colleagues across two different organizations."
Set visibility to Private and add each colleague as a shared user. -
"This app should be available to the entire 'Imaging' team plus one external reviewer."
Set visibility to Private, share with the Imaging team, and add the reviewer as a shared user.
5. Running an application in a workflow
After a release has been deployed, the application is available to run inside a Pennsieve compute workflow.
Browsing available applications
From the left navigation open Analysis → Applications. This tab lists every application available to the current workspace — both Public applications from the wider App Store and Private applications published from your own GitHub repositories.
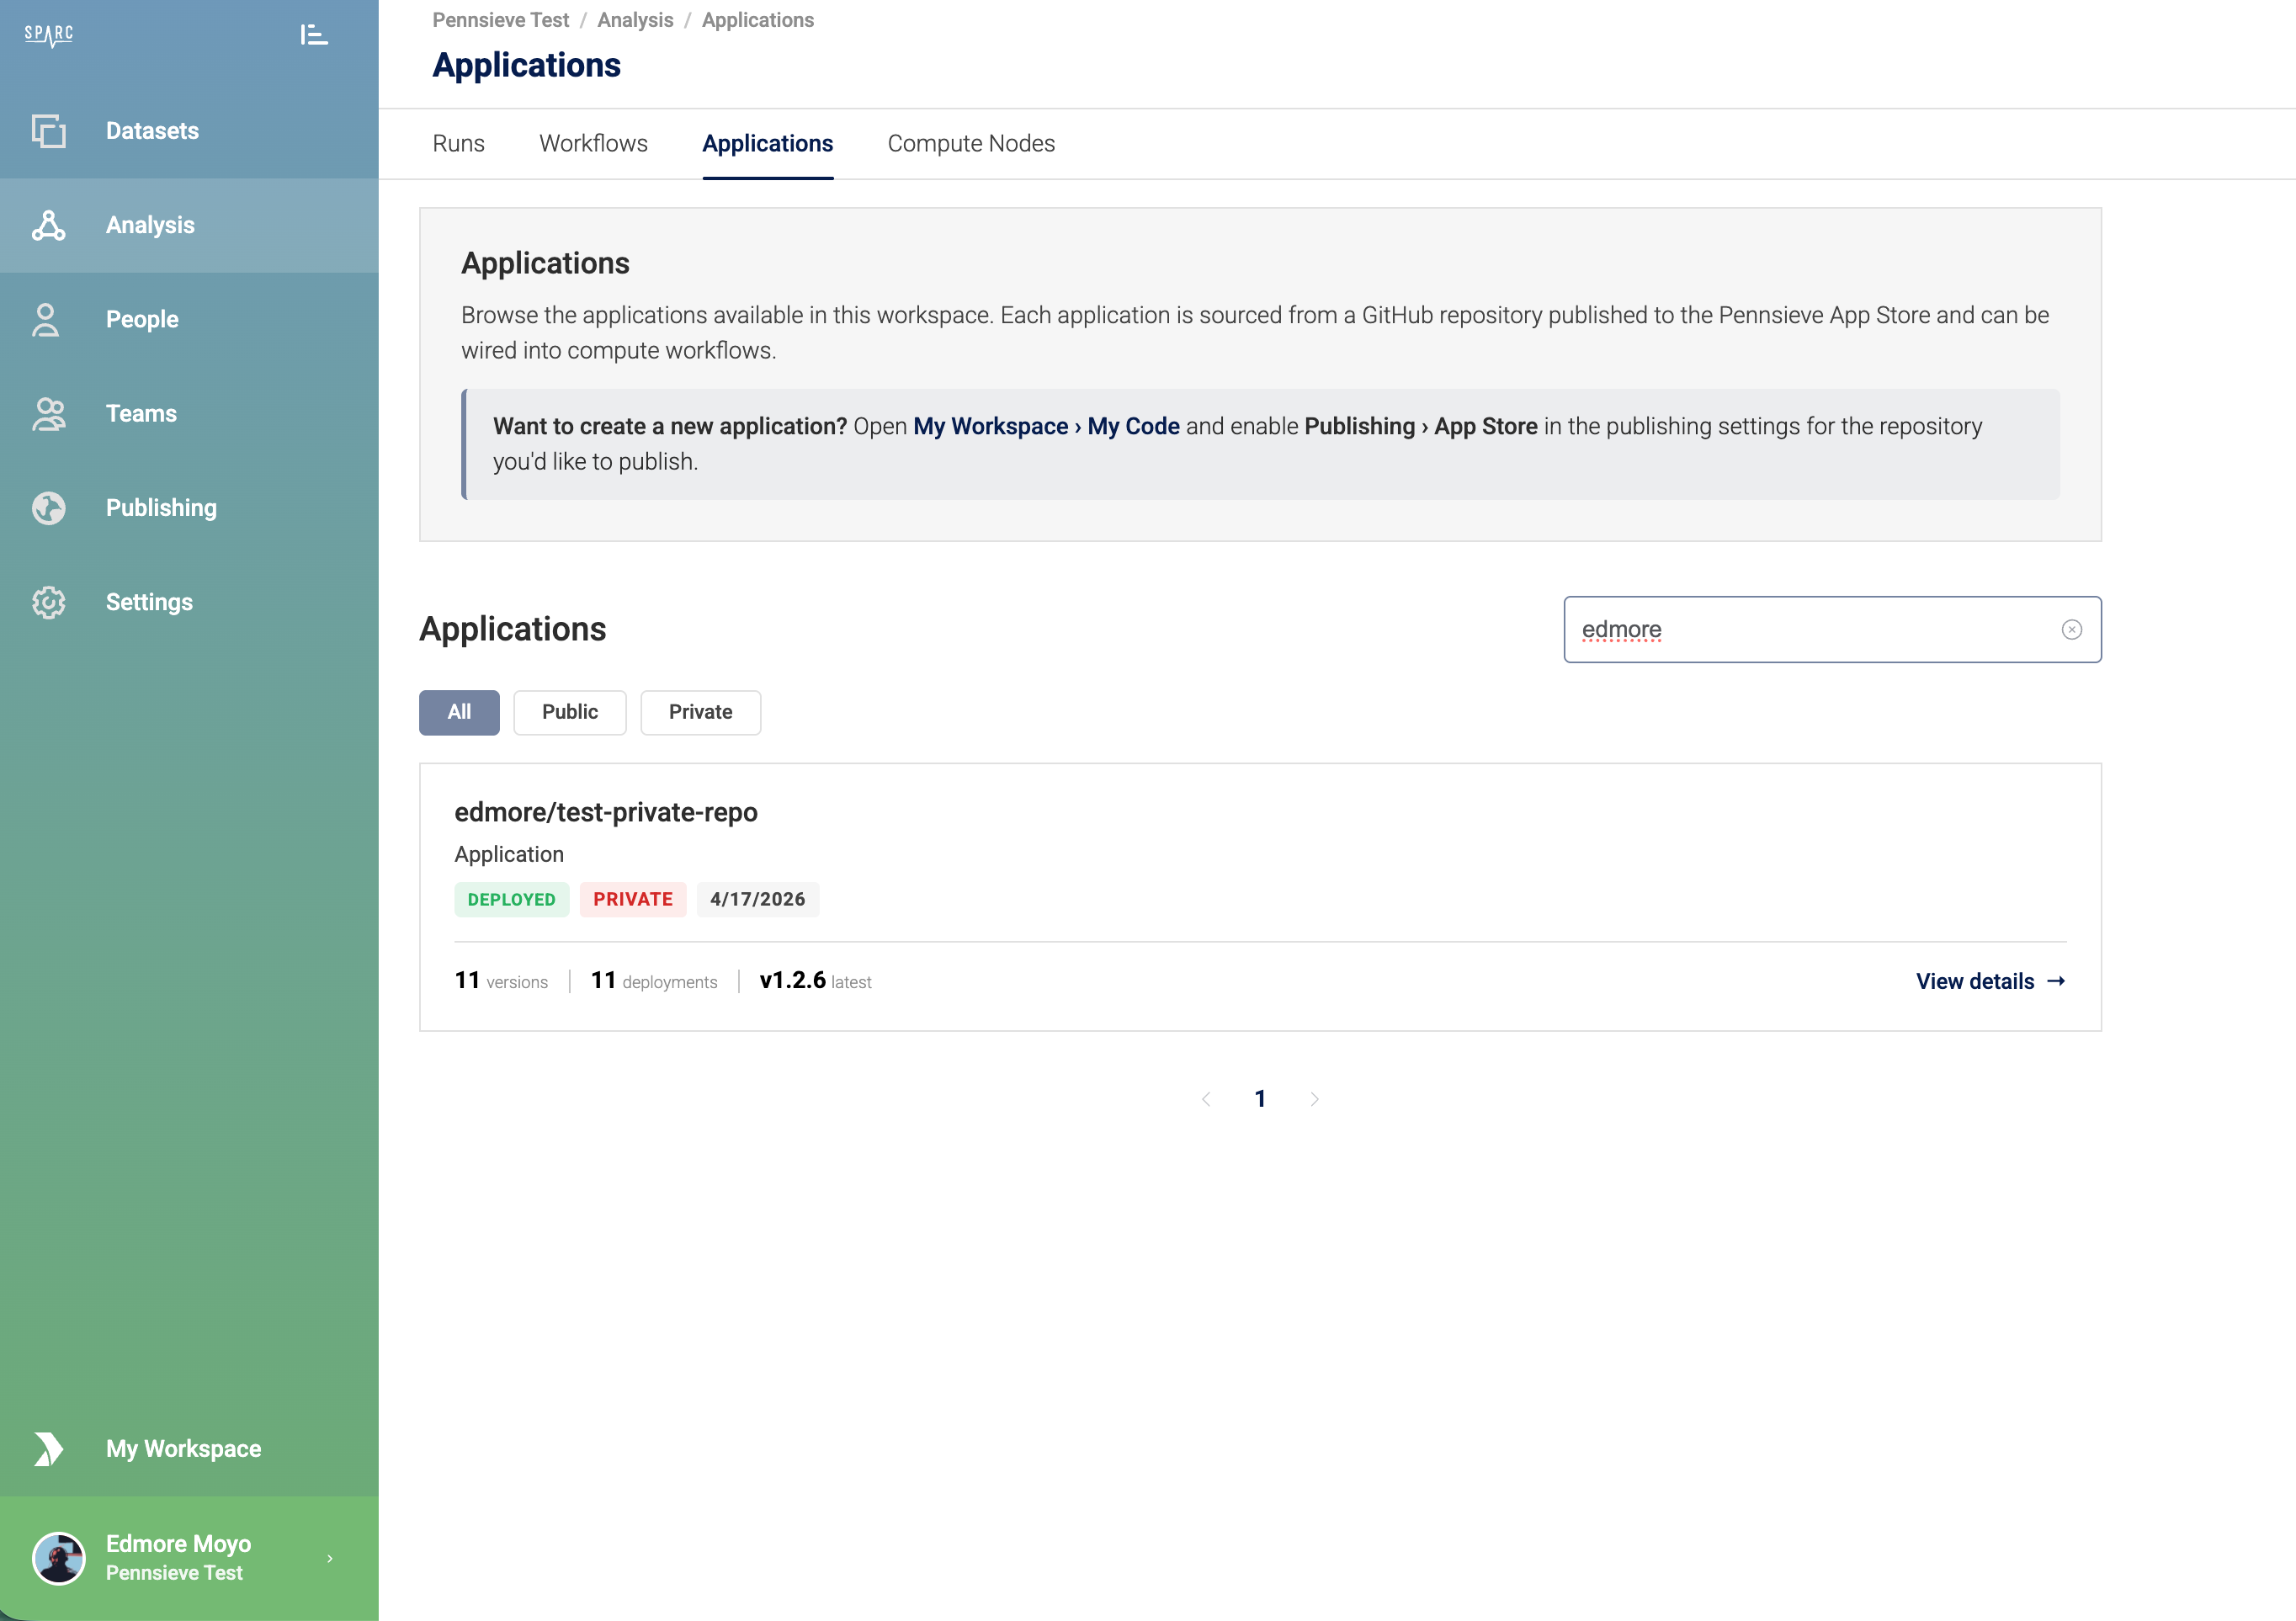
From here you can:
- Filter by visibility using All / Public / Private.
- Search by repository or application name.
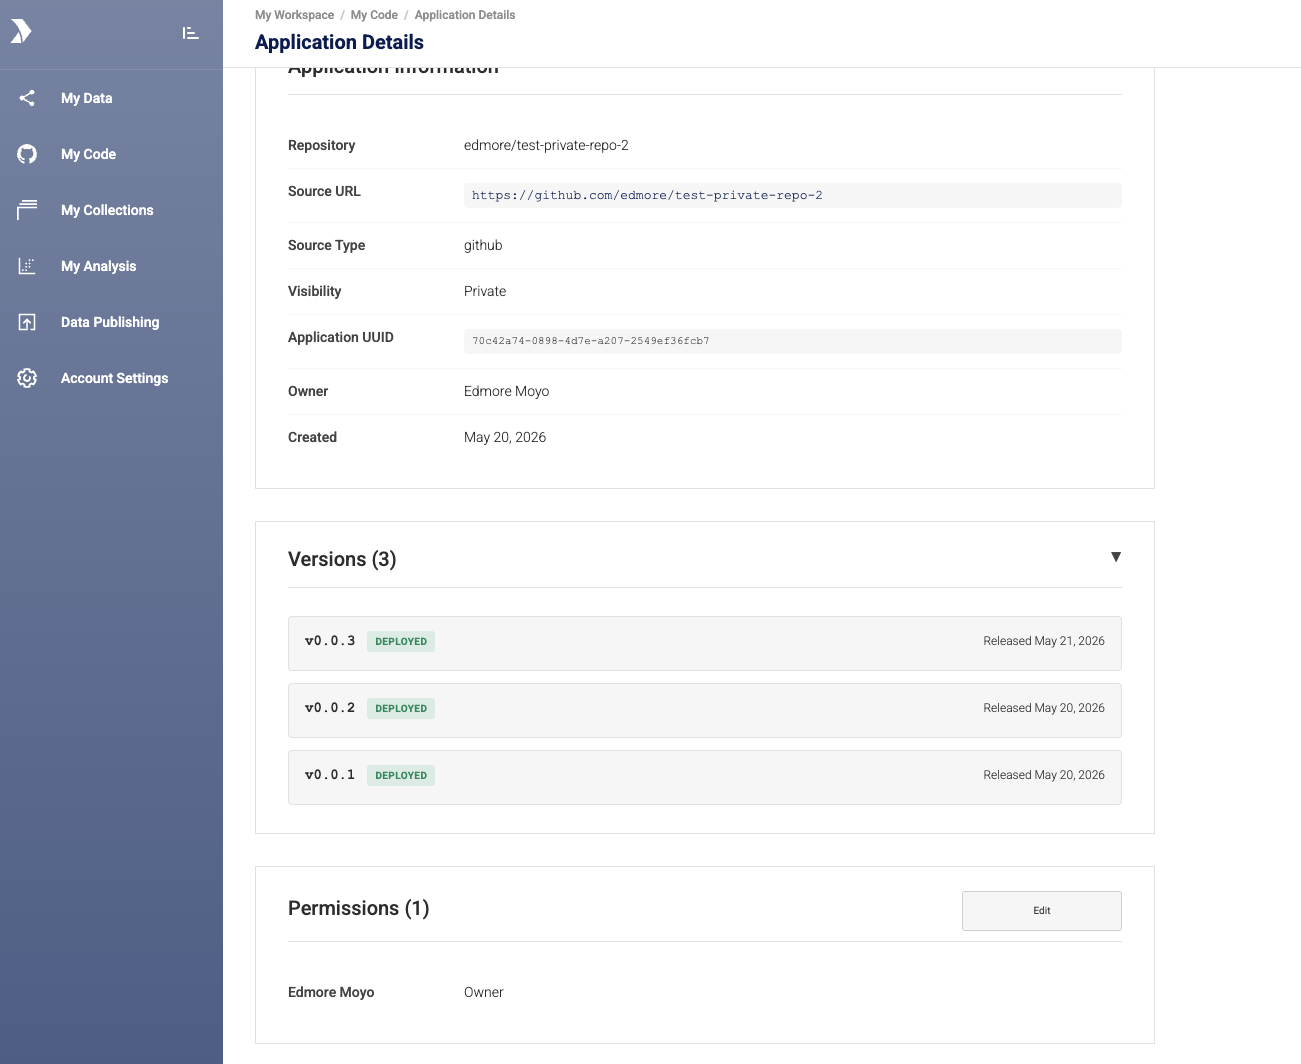
- Click View details on any row to see the version history and metadata for the application.
Don't see your application here? Open My Code → [your repository] and confirm that App Store publishing is enabled and that at least one release has been deployed.
Configuring a run
Compute runs are configured under Analysis → Runs → Configure Run. The canvas has three nodes to wire up: a Data Source, the Application itself (the processor), and a Pennsieve Dataset target for outputs.
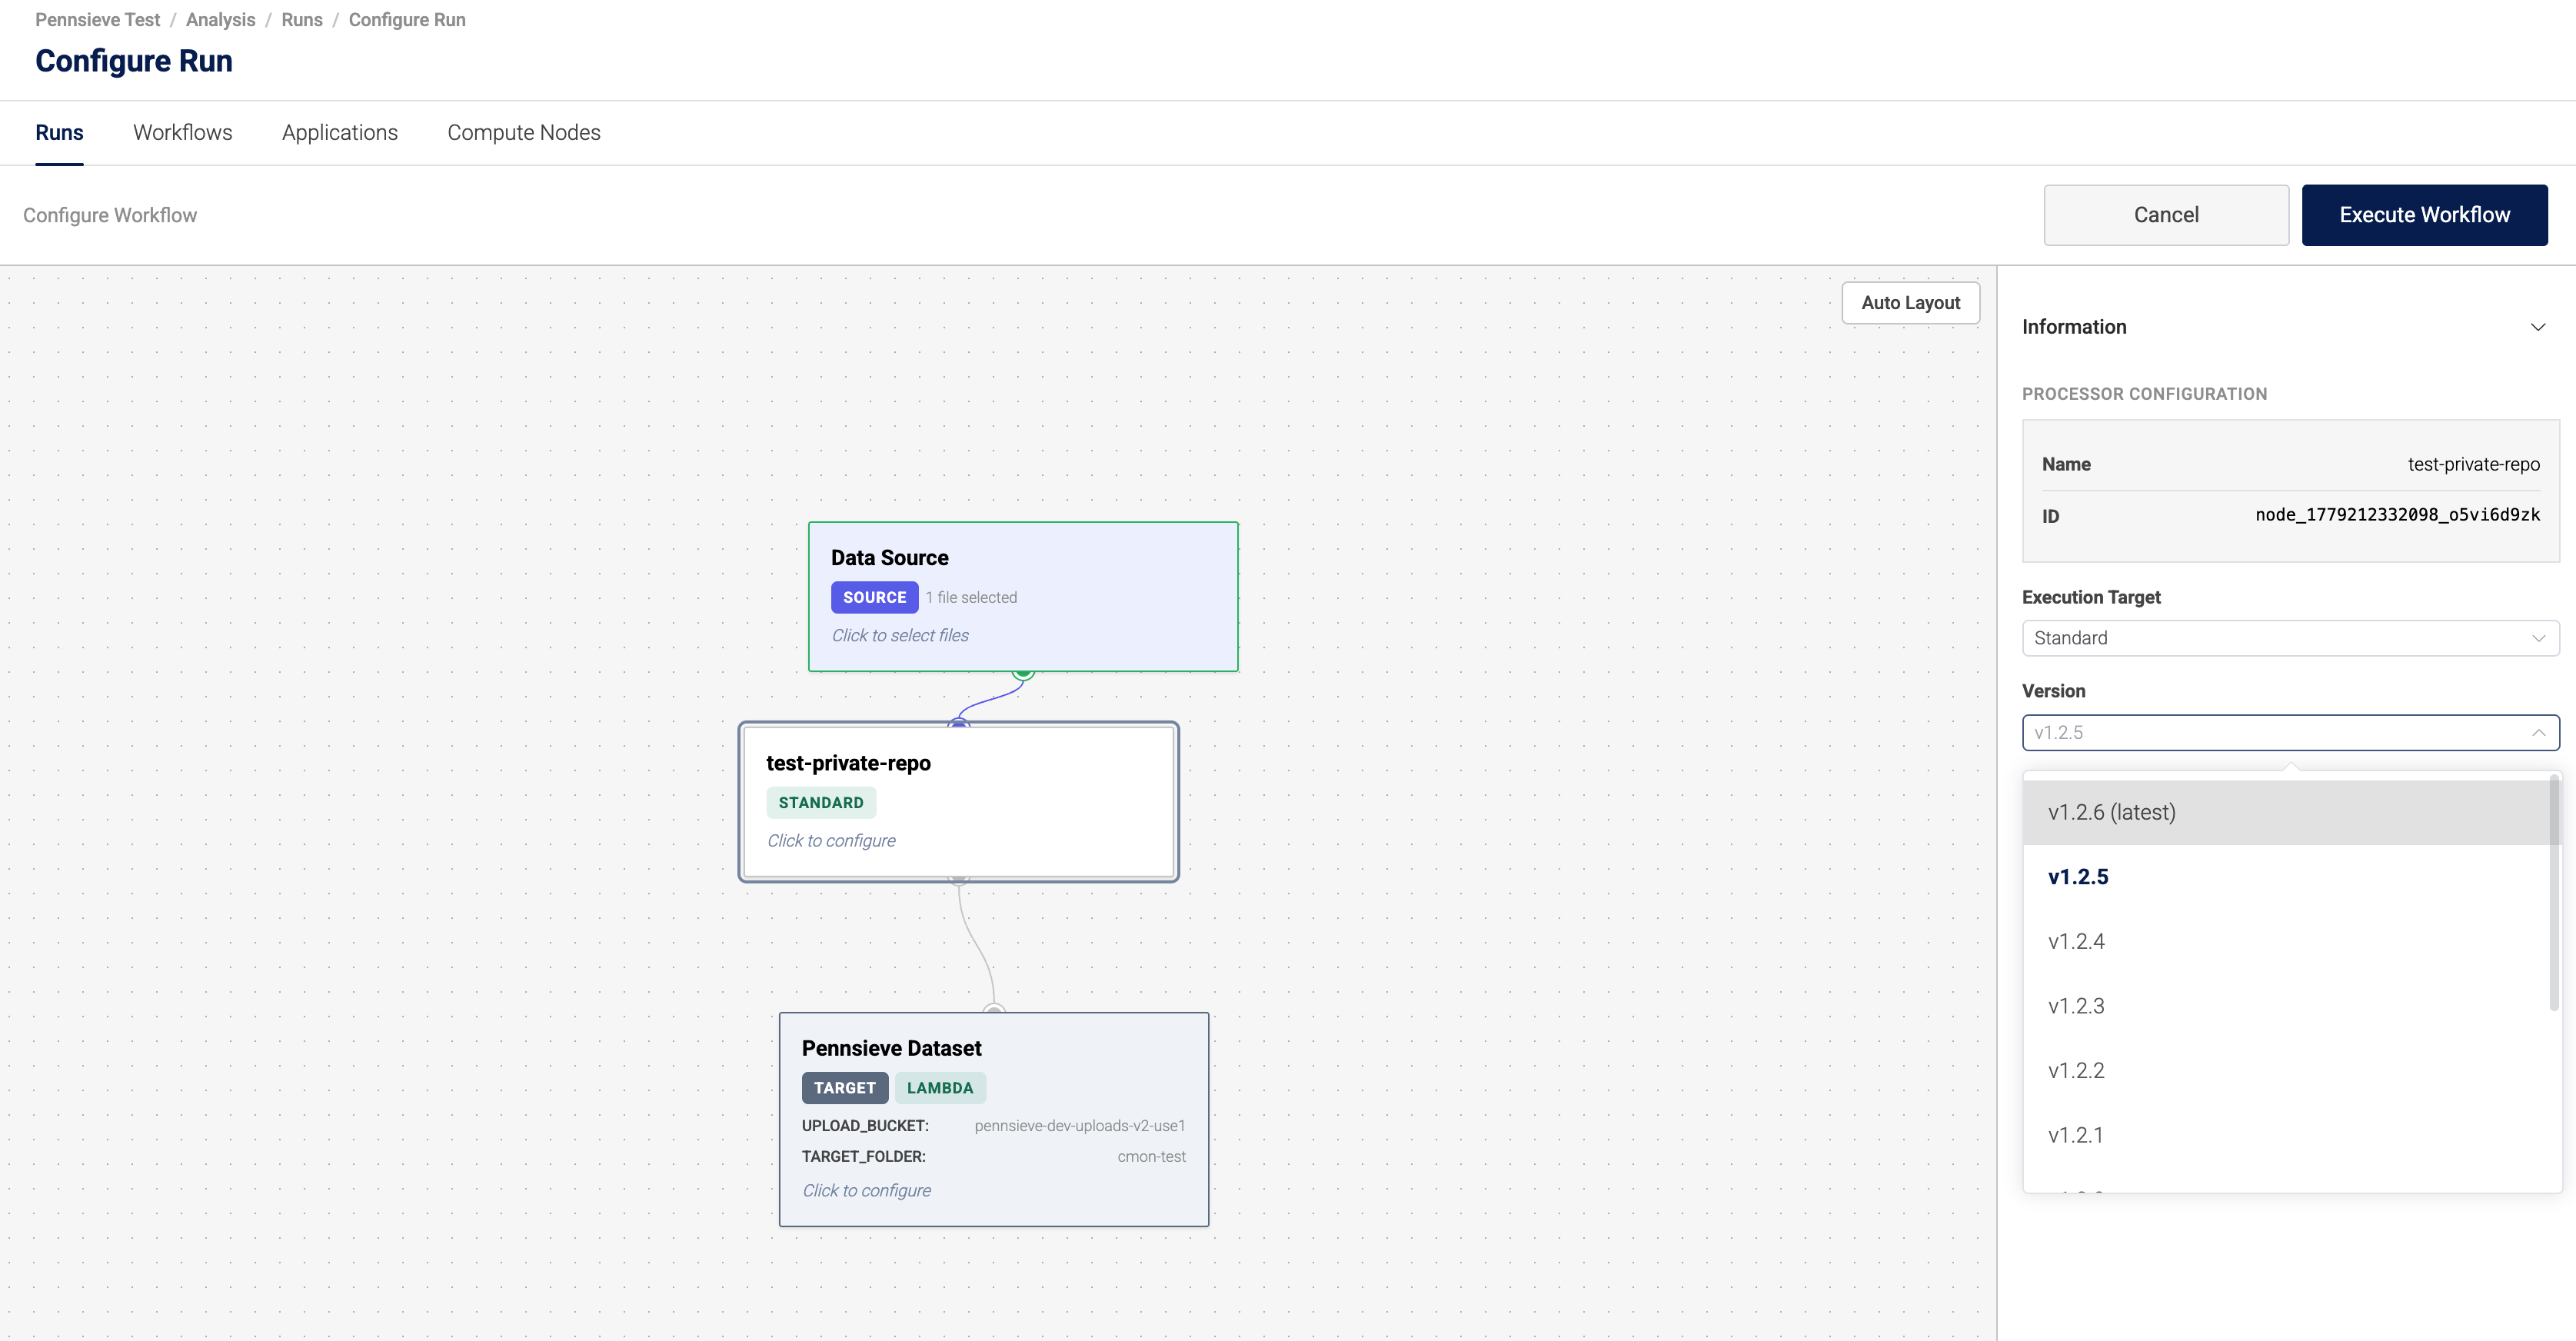
Data Source. Click the Data Source node and select the dataset files you want to feed into the application.
Application (processor). The middle node represents the application you are running. On the right-hand Information panel, choose:
- Name — the application you want to run (defaults to the repository name).
- Execution Target — usually Standard.
- Version — the published version to run. The dropdown lists every deployed version of the application; the most recently published version is marked (latest). Pin to a specific tag if you need reproducible runs.
Pennsieve Dataset (target). Click the Pennsieve Dataset node to choose where outputs are written:
- TARGET_FOLDER — the destination folder inside the dataset.
- UPLOAD_BUCKET — the bucket the workflow uses for outputs (defaults to the workspace's standard upload bucket).
When everything is wired up, click Execute Workflow.
Monitoring the run
After execution starts, the run moves to Run Details. Each node shows its current status, and the panel on the right surfaces the run's overall status, the application version that was used, and a Logs link for debugging.
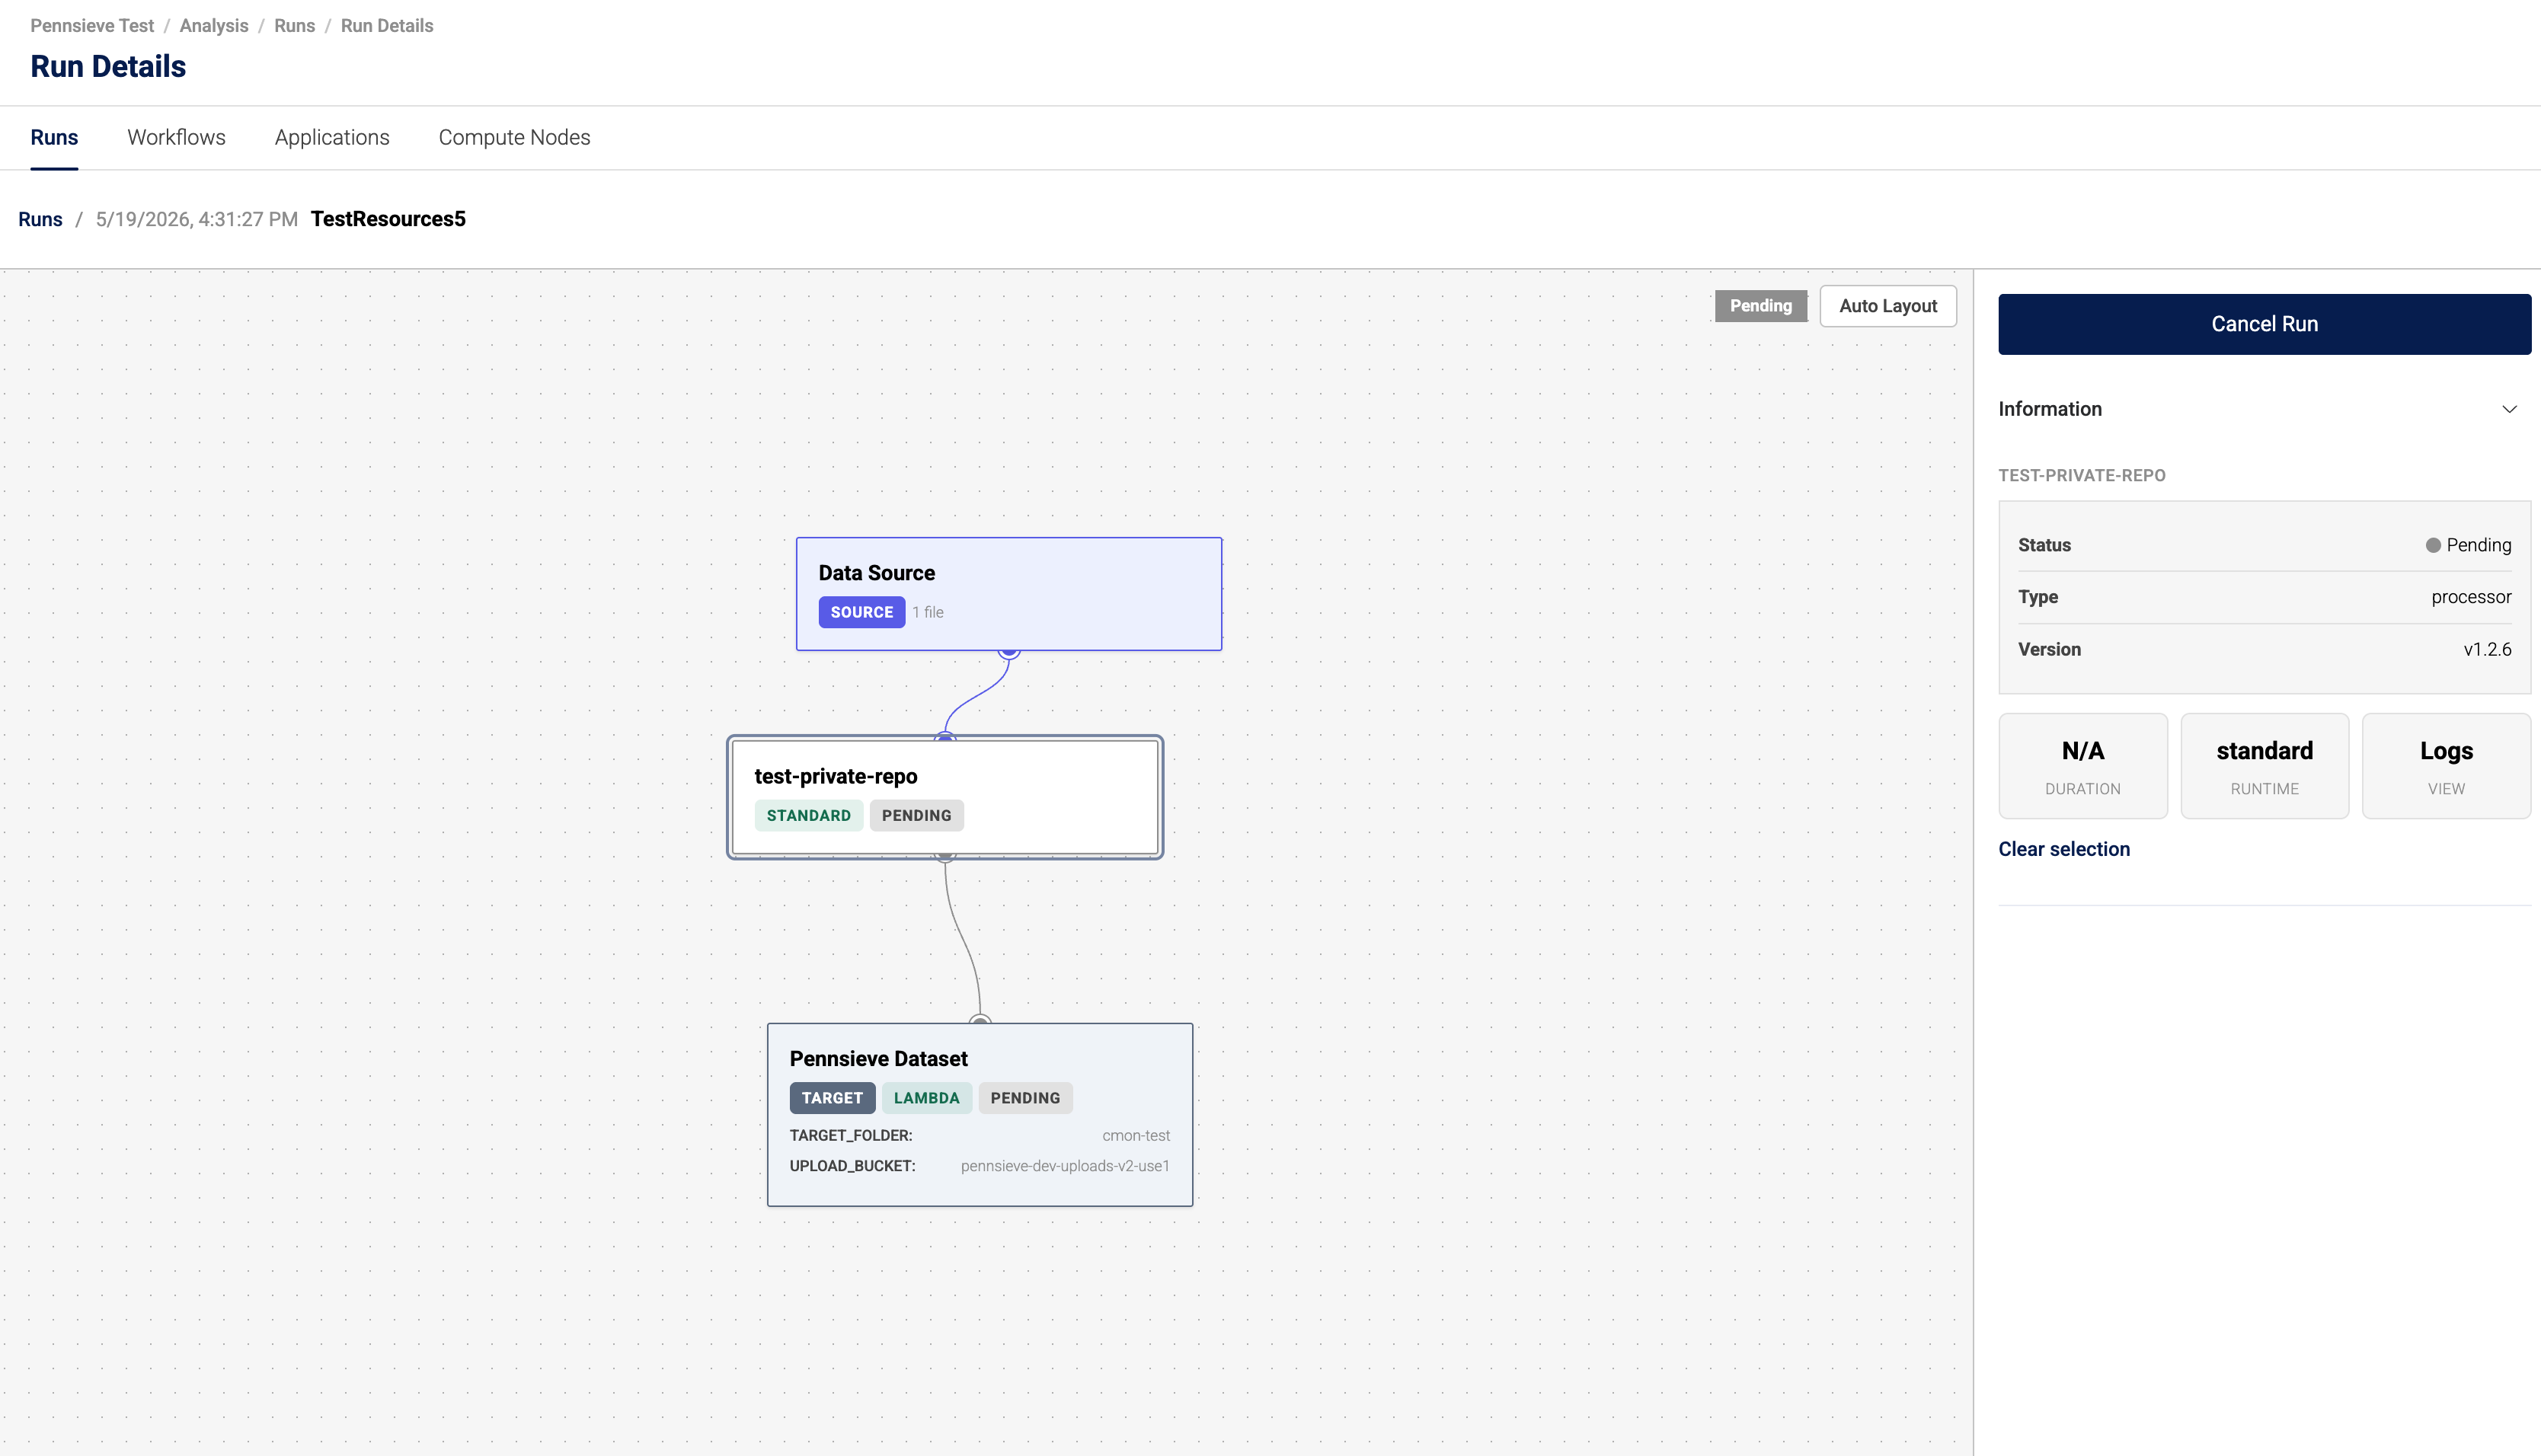
Typical run statuses:
| Status | Meaning |
|---|---|
| Pending | The run is queued and waiting for resources. |
| Running | The application is executing against the selected data source. |
| Succeeded | The run finished cleanly; outputs are in the target folder. |
| Failed | The application returned a non-zero status. Open Logs to investigate. |
To stop a run that is still in progress, click Cancel Run at the top right.
Finding prior runs
All historical runs for the workspace are listed under Analysis → Runs. From there you can:
- Re-open any run's Run Details view.
- See which application version each run used — useful when comparing results before and after a release.
- Re-run a workflow with the same configuration.
Tips
- Pin versions for reproducibility. Selecting (latest) is convenient but means your next run may use a newer release. Pin to an explicit tag for published results.
- Use pre-release labels for in-development versions. Pre-release versions still appear in the dropdown, so collaborators can try them out without making them the workspace default.
- Private applications stay private. Workflows that use a private application are only runnable by workspace members with access to that application.
Updated 2 months ago